Browsing Category

Gift Guides

Gift Guides

How to Make Your Own Stamps with the Carve-A-Stamp Kit

November 19, 2013

Carve-A-Stamp Kit | UncommonGoods
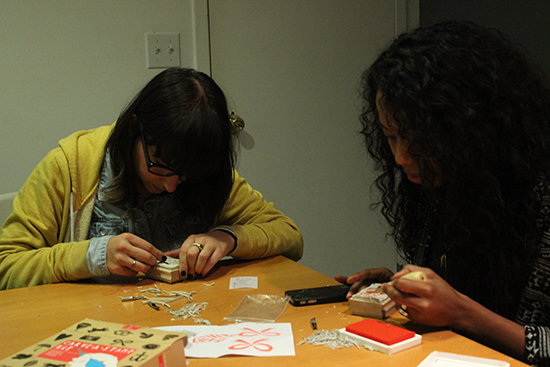
When us Marketing Team gals heard about the new Carve-A-Stamp Kit, we wanted to test it our for ourselves. So a couple weeks ago, we ended work things a little early for some crafting, gossip, and girly tunes in a secluded conference room in the office. (Ok, there were no tunes but if there were, it probably would have been something like Beyonce or Carole King. Or just Beyoncé.) We learned a lot in that small room. Not just about each other, but the kit in general. Here are some things we learned.

Carve-A-Stamp Kit | UncommonGoods
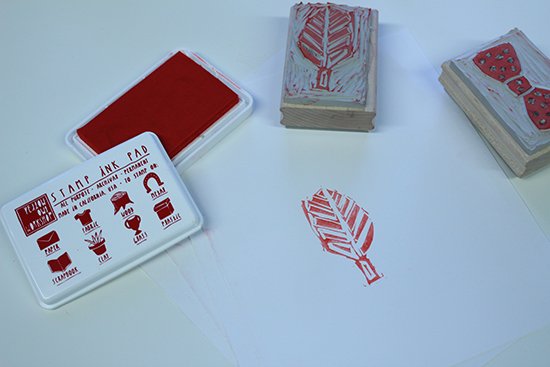
1. The kit comes with easy to follow and beautifully illustrated instructions, 25 original templates designed by Owl City Studio, transfer paper, a stamp block with two sides for carving, a carving tool with multiple blades, a red stamp pad, and a muslin bag to store your finished product.

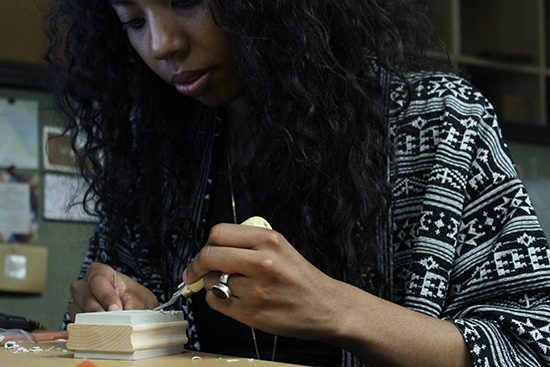
2. The designs are adorable. It was hard for me to choose so I ended up doing the bow and the polka dot bow tie. Good thing the stamp was two-sided – I have an obsession with bows and am terrible at making decisions. Cassie decided on the owl and Emily on the leaf.

Carve-A-Stamp Kit | UncommonGoods
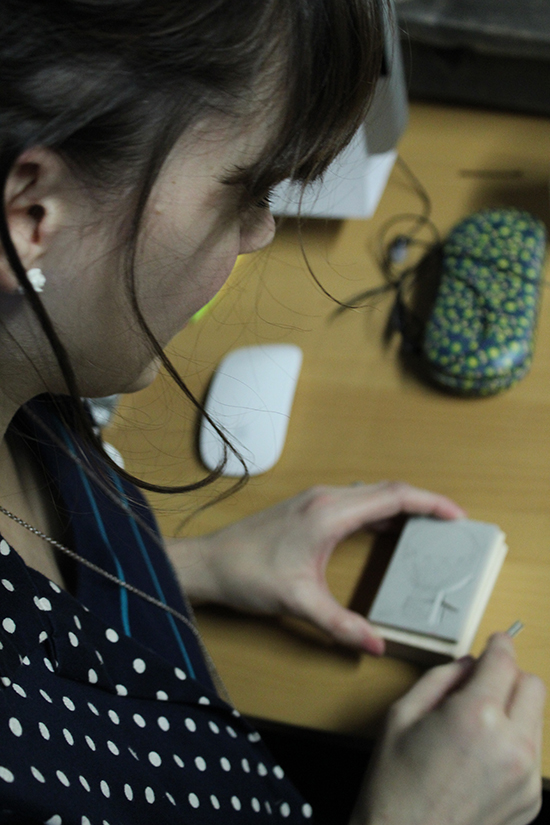
3. The transfer paper is super easy to use. All you had to do was trace one of the designs, place the paper on top of your stamp block, and rub gently to transfer the image onto the stamp. The image showed up nice and clear on the rubber and in the proper direction. Remember: stamps work backwards!

Carve-A-Stamp Kit | UncommonGoods4. The transfer paper also comes in handy when you’re free-handing your design. Fancy-pants graphic designer Jessica drew her stamp creation by hand, a hot air balloon, and used the transfer paper to recreate her original design onto the stamp block.

Carve-A-Stamp Kit | UncommonGoods5. Not every carving tool is for everyone. Since all of our designs were so different – some curvy, another more jagged, some with tiny details and dots – we each found our own favorite carving tool. Test them all to figure out which one works best for you.

Carve-A-Stamp Kit | UncommonGoods6. The finished product is a lot prettier than what you carved. We all looked at our designs when we were done and said “ick” – in unison. But once we stamped the design on some paper, they all looked amazing. All those little imperfections you see (since your eyeballs are probably three inches from the stamp while you’re working) don’t show up when you use the stamp. Plus stamps are supposed to be a little imperfect. That’s their charm!

Happy stamping!

Gift Guides

Gift Lab: How to Make Grilled Cheese (in the Toaster!)

November 15, 2013

Anna Moreno | UncommonGoods

Research
I love a good grilled cheese. The gooey goodness inside reminds me of childhood meals, always paired with a tomato soup, of course. I first saw the Toaster Grilled Cheese Bags and thought it would be a fun, and super easy, way to make that delicious, buttery comfort food. I’d never heard of such a product before. How simple – just put it in a toaster! I’m, however, familiar with the iron-grilled cheese approach…enough said. In comparison, that ironing approach is quite barbaric.

Hypothesis
Given my experience with toast and grilled cheese, I suspect that the sandwiches will be nice and melt-y. However, the warm buttery flavor (that is signature to anything cooked with butter on a frying pan) will be missing.

Experiment
Step 1: Checking out the goods
The Toaster Grilled Cheese Bags are very different than I expected. They’re a silky-papery material. Very tough and pliable. So far, I’m impressed. Three bags are included in the package (wish it was four for those 4 slotted toasters). The grilled cheese in the picture looks really delicious – nice and golden.

Make grilled cheese in your toaster!
Toaster Grilled Cheese Bags | UncommonGoods

The Ooma Bowl
I love the clean and colorful look. It’s meant to easily fit into the hand for holding. Overall, the style gets two thumbs up from me. The bowl may also serve as a nice pet food dish? Food on the left, water on the right.

Ooma Bowl | UncommonGoods

Step 2: Assemble the ingredients
For my experiment I’m making 2 recipes.

First: The Classic. Simple and to the point; white bread, sharp cheddar.

Making Grilled Cheese

Second: Italian Craving–Featuring the Ooma Bowl. Yummy take on the classic done Italian style. My plan is to cut the finished sandwiches into sticks and use to use the Ooma Bowl for easy dipping. Using mozzarella, pesto spread, fresh basil, and sundried tomatoes. For the dipping sauce I’m using my favorite marinara Rao’s Homemade (it’s the best; I highly recommend trying it).

Italian Grilled Cheese

Step 3: Get’m grilled
Attempt Number One:
The Classic. It was pretty simple to get them into the bags. It needed a little maneuvering, but nothing difficult. I have a nice toaster that accommodates bagels. After getting them bagged I put them in, I set the toaster to level 4 and set it into motion.

Easy Toaster Grilled Cheese | UncommonGoods

The end result was not what I was hoping for. Setting 4 didn’t cut it. The cheese didn’t melt, and the bread was not toasted enough. Compared to the picture on the packaging, my sandwich was a total fail. Try again…

Sandwich

Attempt Number Two:
OK, the setting was too low; I overcompensated by upping the game to a level six setting. Also, I was thinking I would try to add some butter to the bread in hopes of obtaining that nice golden buttery glow. I melted 2 tablespoons and brushed the outsides of the bread with a pastry brush. Drum roll please…

I got the taste spot on and beautiful melted cheese. However, I ended up with burnt bread. It didn’t taste bad, but charred is no good either. Also, the butter made the bags all greasy.

grilled cheese

Toaster Grilled Cheese | UncommonGoods

Attempt Number Three:
I completed my attempts with the Classic recipe and moved onto the Italian Craving. First things first, I washed the bags. They got greasy from the butter and the melted cheese. Washing was incredibly easy. I used a simple sponge with handle and hot water. I hand dried, but noticed that the bags held moisture. I didn’t have time to let them air dry, so I continued on with the sandwich making.

I made a total of 4 sandwiches; all of which came out a little darker than I expected. I’m not sure what’s to blame. My toaster setting, the moist bags, the butter; I really am not sure. What I do know is that the sandwiches were tasty. (The chef has to taste their food before it leaves the kitchen).

Italian Grilled Cheese | UncommonGoods

Step 4: Plate and Taste
Time to eat, drink, and be merry. As planned, I cut the grilled cheese into long strips and placed them into the Ooma Bowl. I heated the sauce and added that to the smaller section. Et voila! A culinary masterpiece. (At least for moi, a simple cook.)

Grilled Cheese Fingers with Tomato Sauce

The bowl was easy to hold. Modeled by my fiancé (thank you for your help). Recommended for couch activities such as Sunday sports and Netflix. A delicious end to a full day of ingredient shopping and toaster cooking.

Grilled Cheese Dunk
Noah

Conclusion
Did these match up to the classic grilled cheese? Not completely; however, they were 1. Easy to make and 2. Melt-y and tasty.

Lessons Learned:
1. Don’t apply butter before toasting! It may be good to apply after? Question for thought.
2. The bags need to thoroughly dry before the next use. I later washed, hand dried, and placed on the handle of a frying pan to dry.
3. Toaster settings are key; you need to find the right one. (I have yet to find the right one for my toaster.)

Photo Credit: Moi! Anna Moreno
Model: My fiancé Noah Perkins

Gift Guides

Gift Lab: How to Keep Plants Healthy While You’re Away with the Self Watering Planter

October 23, 2013

Jen | UncommonGoods

Research
I travel a lot and my plants tend to suffer because of it. Turns out it’s easier to find someone to take care of cats than plants – probably because the plants don’t complain as loudly as the cats do. Over the years I’ve tried a bunch of gizmos to get the right amount of water to the plants, but they were all either ineffective, the wrong size for my plant, or just plain old ugly.

Hypothesis
Let me be the first to say that I was skeptical about this planter. It was a good size and attractive, but it seemed too good to be true. The last of my non-succulent plants just died (thanks, cat-sitter), which meant that this was going to be a long experiment. Armed only with slow-drinking succulents, I took a chance on this planter.

Experiment
May 2013: I got my materials together: some succulent planting mix, some decorative rocks, and some new succulents from my favorite store. I took the lid off of the water compartment to check it out, but neglected to put it back on when I started filling the planter with planting mix. Lesson learned: put the lid on because that planting mix goes everywhere and it’s really hard to remove from the water reservoir.

Self Watering Planter With Succulents | UncommonGoods

June 2013: I hadn’t checked the water in a month but the plants looked happy and healthy. The water level had definitely decreased, though it was hard to tell whether this was from the planter soaking up the water and it evaporating, or if the planter was delivering water to the succulents. I filled the reservoir and went on vacation for 3 weeks without leaving watering instructions for the cat-sitter.

Succulents | UncommonGoods

July 2013: I came home to find that (a) the cats were fine and (b) so were the succulents. They were larger than they were when I left and the water was about half gone. I was starting to become a believer.

Growing Succulents | UncommonGoods

August 2013: Baby succulents began popping up – this was the clearest sign that the planter was delivering water as promised. Another sign that the planter was working: the succulents that I hand-watered were all near-dead from over-watering.

Beautiful Baby Succulents | UncommonGoods

Conclusion
1. This planter actually works.
2. The planter has got to be much more impressive with something that needs more water. I’m going to get another one and try to grow some herbs.
3. Put some little plastic feet at the bottom of the planter to raise the planter a bit above the windowsill or table it’s sitting on. I found that the water in the reservoir affected the paint on my windowsill.

Gift Guides

Gift Lab: How to Make Music by Playing Wine Glasses

September 27, 2013

Major Scale Musical Wine Glasses | UncommonGoods

Research
As a developer of the Major Scale Musical Wine Glasses®, my knowledge of the product is quite comprehensive, but this was my first chance to test a random unit straight off the production floor. In developing these musical glasses, we looked for a glass that would allow for a full A major scale, allowing for more versatile music-making. We used a high-quality lead-free crystal glass here to ensure the best resonance we could achieve.

I’m not a big wine drinker, but you’ll find me sneaking a swig of water every now and again – so I’m conducting this experiment with water as an alternative. I try to keep practice on my violin, but I’m much more likely to produce something resembling music with my finger on these glasses than with my bow on strings – so I’m looking forward to the chance to actually hit the right notes for a change.

Musical Wine Glass Packaging | Uncommon Goods

Hypothesis
Due to variations in glass we knew absolute, orchestral perfection was a bit too aspirational, but we have been pleased to find that the fill lines correspond quite nicely to the note indicated. My hypothesis is that I’ll have a pretty happy match today.

Experiment
Fill ‘er up! I poured to the first note – an ‘A,’ moistened my finger in another glass to allow for smooth movement around the rim, and round my finger went firmly in a circular motion. As I draw my finger around the rim, the alternating slipping and sticking creates a vibration pattern in the glass. The speed of vibration, meanwhile, is affected by the volume of liquid in the glass, and different vibrations will produce different notes. The results of my first attempt?

Playing Music on Wine Glasses

A lovely ‘A’ note resonates through the dining room, accompanied by a hypnotic ripple along the surface of the wine. As you can see…a successful ‘A’!

'A' Note

I toast to a successful first pour and continue on my journey through the A Major scale.

I poured a taller glass and around I went again.

Major Scale Musical Wine Glass | UncommonGoods

Crosschecking with another tuner – a direct hit! SuccEss with a capital ‘E’.

'E' NoteConclusion

Though slight variations in glass will yield somewhat different performance, a random test proved more than satisfactory to my unprofessional, yet music-appreciating ears. Very content and ready to wet my whistle, I toast to beautiful music with my fiancée and Franklin Broccoli, our almost-real pet bulldog.

Musical Wine Glass Toast

To see and hear these uncommon instruments make music with your own eyes and ears, check out this video of me playing Vivaldi’s Four Seasons.

Gift Guides

Gift Lab: How to Get the Perfect Shave

August 27, 2013

Jeff | UncommonGoods Customer Service

Research
I shave every other day, occasionally back to back days, and end up spending $40.00 to $50.00 using disposable blades such as Mach3 and Proglide. Usually after two shaves the blade does not give a close shave at all. I heard the Razor Pit Sharpener will solve this problem and save me lots of $$$$.
Razor Pit Razor Sharpener

Hypothesis
I am curious to see if there truly is some way to extend the life of my disposables; everything I have heard and read about the Razor Pit Sharpener makes me hopeful this is the tool to use.
Sharpen your Razor

usingpit1

Experiment
Pretty simple stuff here, you can use a squirt of shaving cream or soap to lather up the surface of the Pit. You then push your razor FORWARD–five or six times will do. I found that pushing it once, then rubbing the shaving cream around so it covers the entire surface again, then doing my second push and so on to the fifth or sixth push. Then I ran the blade under COLD water for a few seconds (cold contracts the metal, which is good. My own tip). Then you shave!!!
Jeff Shaving | UncommonGoods

shaving1

Conclusion
No kidding, this is incredible! The four (very old, perhaps a few months) blades I tested on each gave me a shave that is just about the same as a brand new blade. I used it for two weeks, then shaved once more with a brand new blade. I found no difference between the Razor-Pitted blades and the brand new one. While I suppose that I will eventually have to buy new blades, I can certainly see my costs being at least half, so I will have paid for my pit within two months.
sharprazors

Gift Guides

12 Pieces of Art for Special Ocassions

July 29, 2013

This summer has been FULL of joyous occasions. Weddings, baby showers, birthdays! So much fun and happiness. But the hard part about all these celebrations? The gifts! Finding the right present can be so stressful.

Over the years, I’ve found one foolproof gift: artwork. Artwork is always unique, thoughtful, and memorable no matter what the occasion. I mean, who wouldn’t want an awesome new print for their wall? Plus giving artwork will earn you some major cool points. Promise.

Not sure where to start? Here are some of my favorite works from the Uncommon Artist Gallery organized by occasion…

Art for a baby shower | UncommonGoods01. Storks by Denise Fiedler

02. Building Blocks Personalized Art by Alexander Doll

03. Bubbles by Andrea Doss

Art for wedding gifts | UncommonGoods01. Love Carries All by Zlatka Paneva

02. Custom Cross Stitch Portrait by Elizabeth Dabczynski

03. Personalized Couple Tandem Bike by Patrica Carlin

Birthday art for her | UncommonGoods01. Beach by Yao Cheng

02. Going to See My Baby Blue by Allison Glancey and Craig Seder

03. Do What You Want by Jessica Swift

Art gift ideas for him | UncommonGoods01. All the Mountains in Colorado by James Gulliver Hancock

02. AIGA/NY 30th Anniversary Poster by Maira Kalman

03. Rocky Mountain Daybreak Bison by Dolan Geiman

Check out more gift-worthy artwork in the Uncommon Artist Gallery!

Gift Guides

A Day at the Beach

June 25, 2013

Warm sun, waves crashing on the shore, that coconut-y smell of sunscreen. Is there anything better than a day at the beach? Nope. Nothing.

I can’t wait for a few relaxing beach days this summer. Here are a few things on my beach wish list this year…

01. Beach Ball Roundy Towel. Guys, this over-sized towel is made to carry! It has a sturdy strap that allows you to pick it up and swing it over your shoulder. Think of all the free space you’ll have in your tote bag now… and a lot less sand.

02. Upcycled Mail Sack iPad Case. Admit it. You totally bring your iPad to the beach. No? Just me? Well maybe you would if you had this awesome case, think about it.

03. Custom Map Tote Bag. Tote bags are a beach must-have. This one has a ton of pockets and space, plus I absolutely love the authentic nautical chart.

04. Custom Beach Stacking Rings. I always want to wear jewelry at the beach, but none of my day-to-day accessories quite fit. These rings are perfect. They feature granules gathered from over 1,000 shorelines around the world. Wow, love.

05. Beach Sounds Portable Speaker. A day at the beach just isn’t complete without the right soundtrack. Plug in your iPhone, strap it safely inside, and you’re ready for a beach dance party.

06. Bamboo Sunglasses. I’m all about the bamboo sunglasses this summer. They’re so lightweight and durable. Perfect for the beach.

07. Beach Chess and Checkers. Playing checkers on the beach sounds so relaxing after a long day of swimming, don’t you think?

08. Sprocket Rocket Camera. I take photos everywhere I go… with my iPhone. I’d love to take this camera to the beach to capture some photos the old fashioned way.

Are you planning on spending some time at the beach this summer? What’s on your beach wish list?

Gift Guides

Gift Lab: How to Stay Chill & Kick Back Cold Ones

June 11, 2013

Research
I was already familiar with the Corkcicle, but was excited to hear of the introduction of the Chillsner— a stainless steel tool you freeze and then put in your beer, juice, or soda.

Hypothesis
My hope is that my beverage remains cold, even if I get distracted playing video games.

Experiment
I have to admit I was a little skeptical about using the Chillsner. Also I was a little nervous my lips would get stuck to it, due to the Chillsner’s time in the freezer. So on the first night, I put the product in the freezer for an hour. (The instructions call for 45 minutes.) I took it out and stuck it in the bottle, but not following the instructions, I spilled some of my beer because I didn’t take a sip first. Stupid physics.

The first attempt worked pretty well, even though I purposely put the Chillsner in a warm beer, and it cooled it pretty quickly. Yum.

The next night, the Chillsner had been in the freezer for 24 hours. My lips still didn’t get stuck. Also I made sure not to spill my beer. It kept my chilled beer chilled as I nursed it for an hour and a half. Normally I don’t take this long to drink a beer, but sacrifices must be made in the name of science.

Conclusion
Overall, I was pleased. My beer stayed cold for much longer than I was used to. I look forward to using the Chillsner this summer.