Browsing Tag

Design

Design

Frank Lloyd Wright For Our Feathered Friends

January 28, 2015

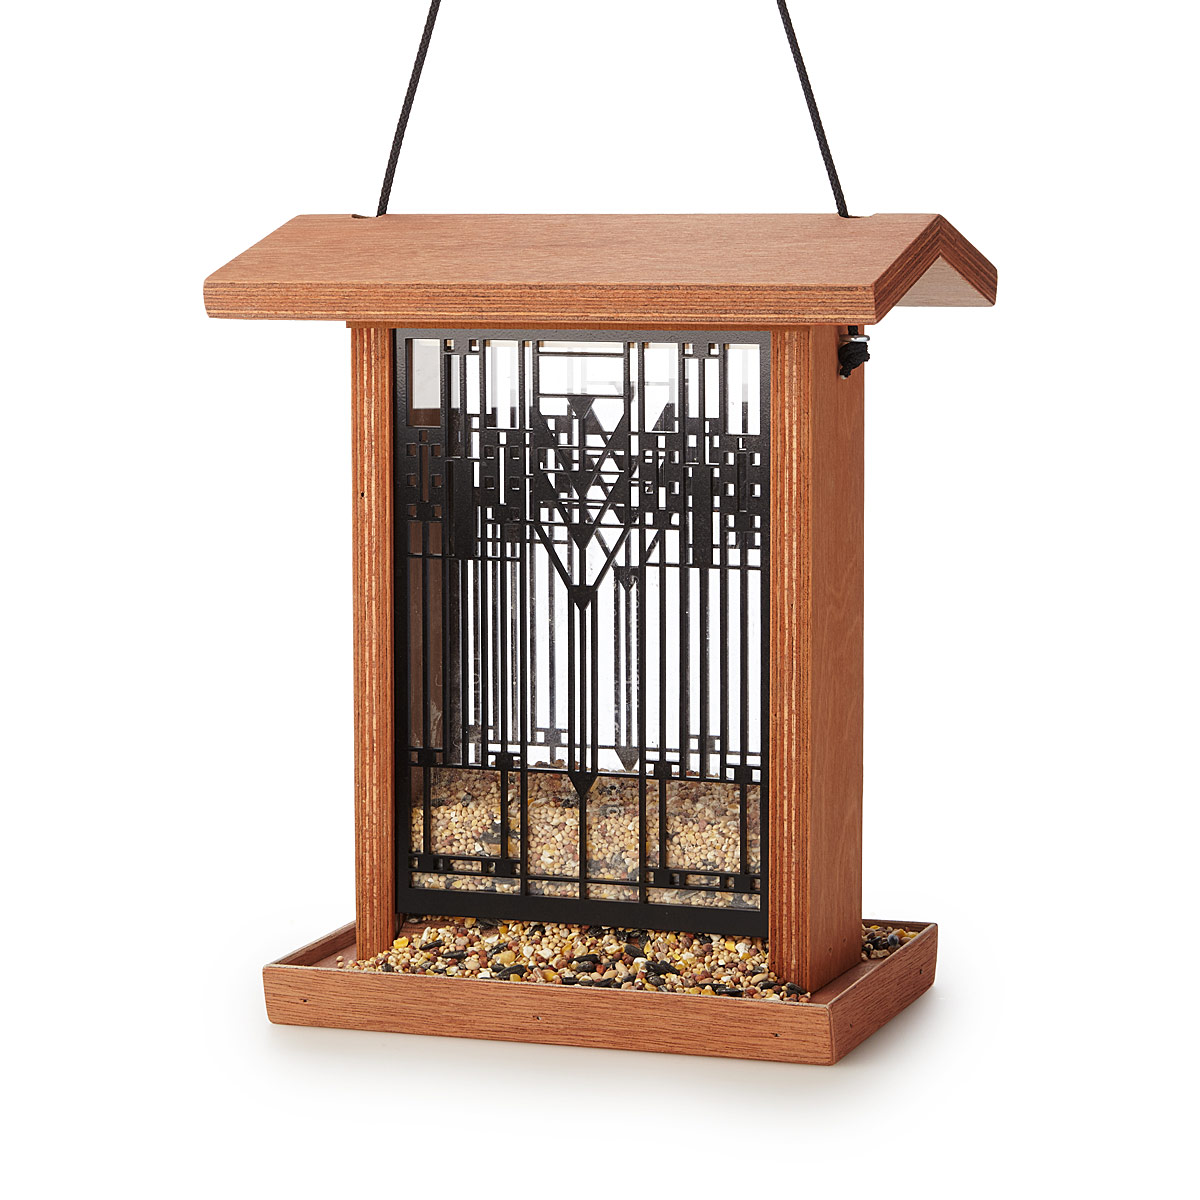
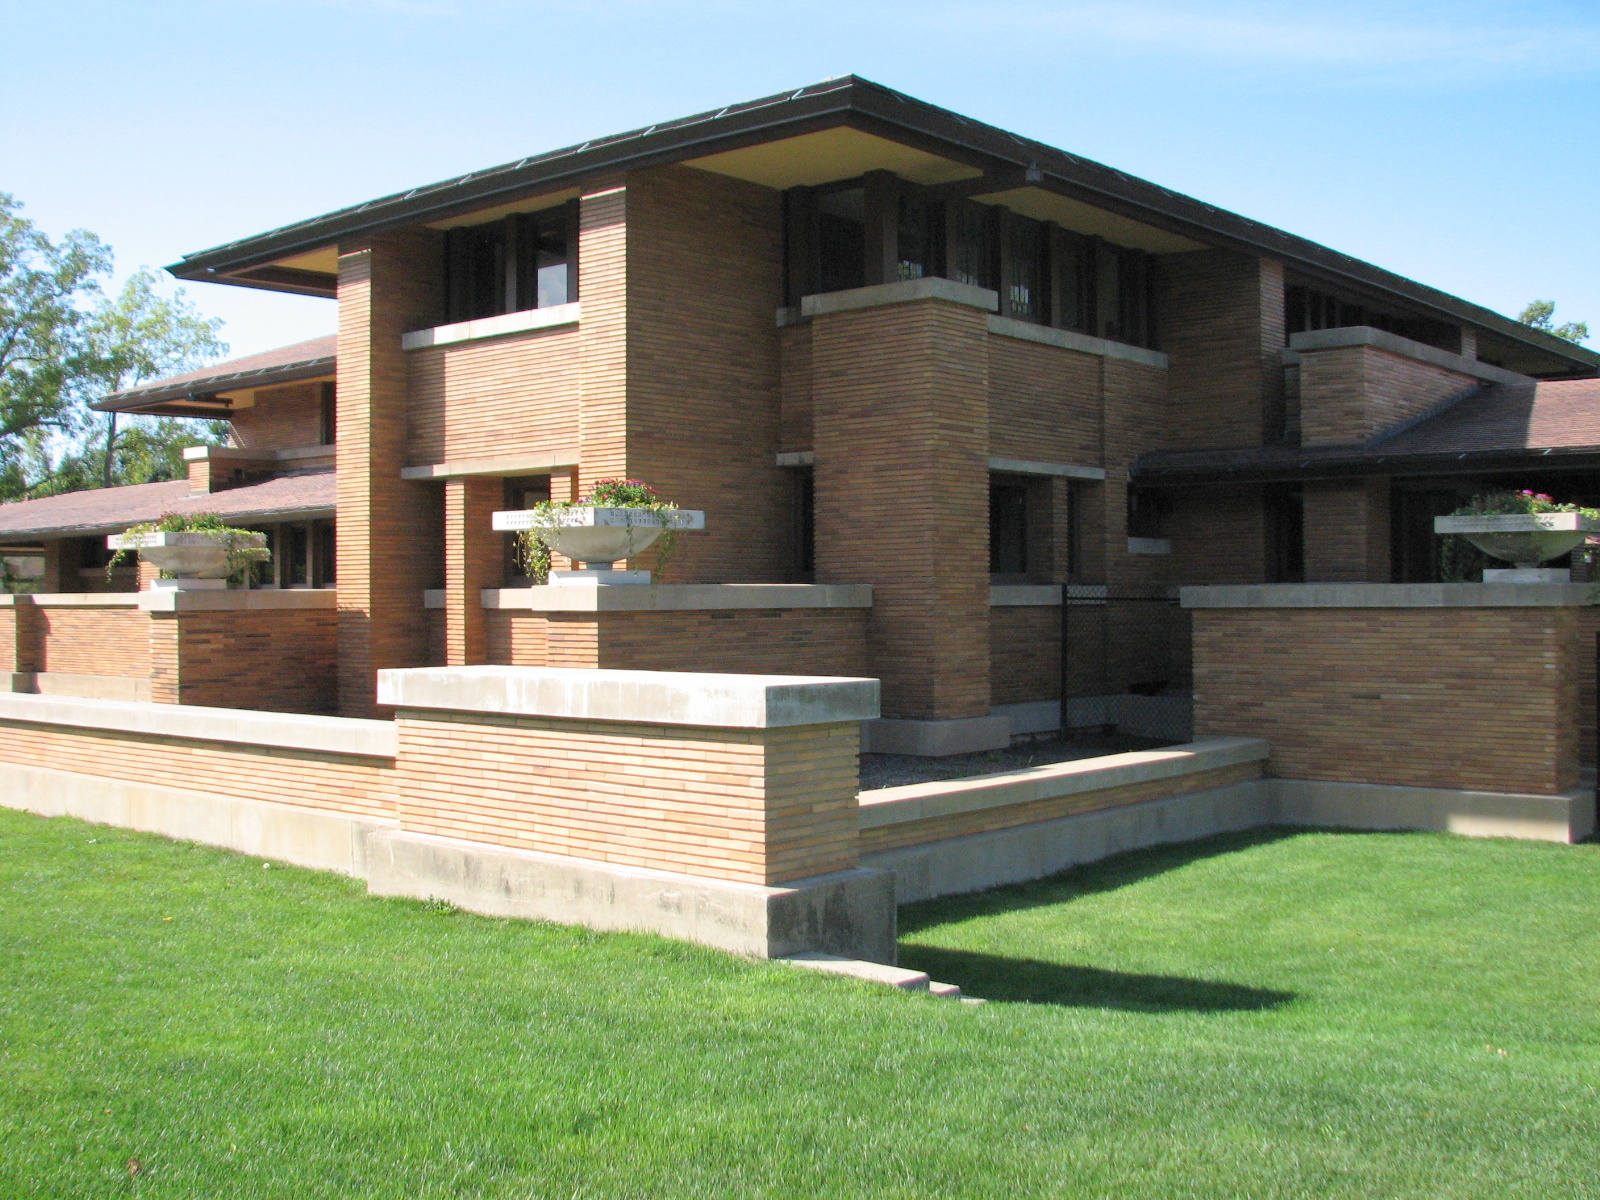
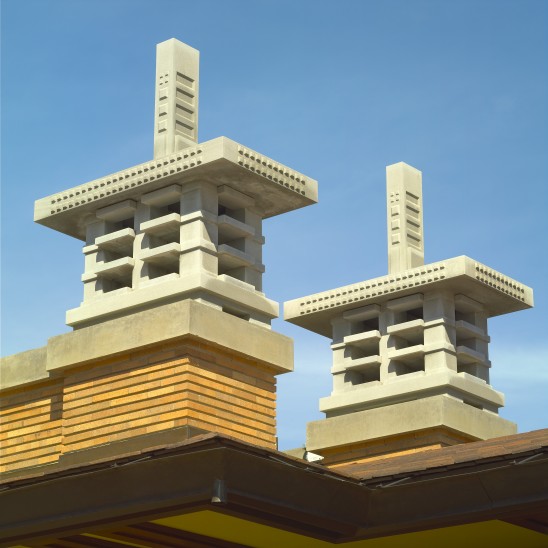
When I saw the sample of our new Prairie Bird Feeder from across the room, I recognized its inspiration instantly: the so-called “Tree of Life” art glass pattern—probably the best-known motif from Frank Lloyd Wright’s Buffalo masterpiece, the Darwin D. Martin House.


Prairie Bird Feeder

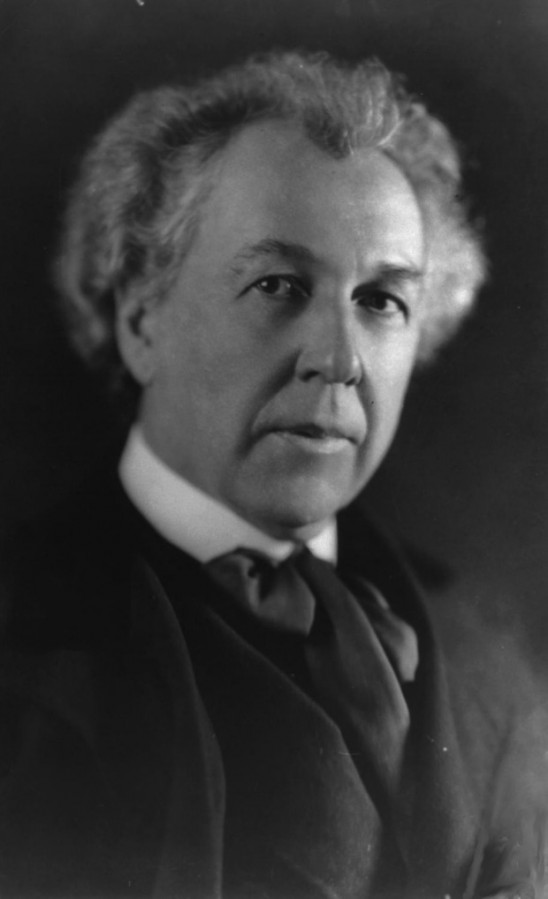
But I suppose I should be able to spot such patterns at 50 paces. After all, I spent nine years as curator for the Martin House Restoration Corporation, helping to preserve, document, and share such designs with the public. I stopped short of getting a Tree of Life tattoo, but you might say that the Prairie style is in my blood.

Frank Lloyd Wright designed in concert with Nature—with a capital N, he insisted—and Drew Kelley’s Wright-inspired bird feeder design follows that organic lead. The cedar feeder is simply stained as Wright might have done, and its miniature roof is gently pitched and cantilevered like the rooflines of the Martin House and other homes of Wright’s Prairie period (c. 1900-1914). Add the art glass motif applied to the side panels, and those birds will be eating in sublime style.

Darwin D. Martin House

Darwin D. Martin House, Wikimedia Commons
But there’s another connection between Kelley’s bird feeder and the Wright house that inspired it. With relatively free reign on his ambitious Buffalo commission, Wright designed not only an interconnected complex of five buildings for the Martin family, but also an impressive complement of furniture, fixtures, art glass (nearly 400 pieces), and custom architectural details. He even designed custom clothesline poles for the kitchen garden and four limestone birdhouses to adorn the roof of the Martins’ conservatory.

Wright’s birdhouses feature multiple chambers in a colony-like configuration favored by purple martins. So, scholars suspect that the birdhouses were, in part, a play on the name of the client (martin / Martin). And like purple martins, the human Martins lived communally, with extended Martin family (Darwin D. Martin’s sister Delta Barton and her family in the smaller house in the complex) and servants living in the same complex. Beyond Buffalo, Wright also designed a custom birdhouse for the Westcott house in Springfield, Ohio.

Darwin Martin Bird Houses

Birdhouses, Darwin D. Martin House. Biff Henrich /IMG_INK, courtesy Martin House Restoration Corporation.
After challenging American architecture in the Prairie period, Wright went on to design some of the most iconic buildings of the 20th century, such as Fallingwater and the Guggenheim museum in New York. His body of work—both realized and conceptual—also includes a mile high skyscraper for Chicago, and a house for Marilyn Monroe and Arthur Miller.

Despite this dazzling portfolio, you can safely say that at least a few of Frank Lloyd Wright’s designs were for the birds…and so is our new bird feeder.

Maker Stories

Glass Winner Heather Trimlett Melts Our Hearts With Her Vibrant Design

January 16, 2015

Heather Trimlett | Glass Design Challenge Winner

I remember the first time that I watched a glass artist use a torch. I was sitting in a glassblowing demonstration at an art fair, surrounded by a big crowd waiting to witness what would happen when molten glass meets high heat. The crowd’s silence gave way to an entrancing performance. Watching the artist manipulate red and orange glass was like getting hypnotized by a campfire. I couldn’t imagine the patience and precision required to work hand-in-hand with an alluring, deadly element.

One glance at Heather Trimlett’s Spiro Earrings instantly takes me back to that day. I can tell that Heather’s ability to twist glass into a freely flowing pattern requires an eye for enchantment. As I got to know Heather during this interview, it doesn’t surprise me that she found her niche in jewelry making. Her personality is just as warm, friendly, and colorful as her beautiful pieces. Her color palette is a perfect match for our assortment! Meet Glass Design Challenge Winner Heather Trimlett, and learn about the process behind her winning design, her first experiences at the torch, and how she views the world in multicolored glasses.

Spiro Earrings | Glass Design Challenge Winner | UncommonGoods


How did you come up with the concept of your winning design?
For years I have played, practiced and experimented with carefully layering different colors of glass on top of each other and creating twists made of these different colors of glass. When I realized that adding a rod of clear glass to my twists would magnify the colors and allow them to appear to float freely in the clear glass, I had my magic. This combination of layering and precise twisting came together for the Spiro Earring design.

Heather Trimlett | Glass Design Challenge Winner

How did you celebrate when you found out that you won our Glass Design Challenge?
My first wave of euphoria came when I found out I had been accepted into the UncommonGoods Glass Challenge! I sent an email to all my clients, students and supporters, and asked them to please vote for my earrings! I was thrilled by their enthusiastic response.

Then I won, but couldn’t tell anyone! During the “period of secrecy,” I told a few close friends and toasted with a few glasses of wine. My insides were jumping up and down yelling “YEA!”

Once it was OK to tell, I sent an email to EVERYONE I knew to tell them I had won!

Heather Trimlett | Glass Design Challenge Winner

Can you tell us 3 fun, random facts about yourself?
1. I’m an avid gardener. Propagating my Staghorn ferns then sharing the babies with friends ranks high on the list of fun things about the garden. Spending all day Sunday in the garden is the definition of a perfect day for me. My fingers are perpetually crossed that one day my Proteas will decide to bloom. My newest venture is growing things we can actually eat.

2. I have become a collector of Lego figures. Probably the influence of a 4-year-old grandson. Or is it all those bright colors?

3. While I sit at my torch making beads, I watch bees drinking at my fountain. It’s amazing; there are hundreds of bees every day in the summer! The bees at the fountain, conversations with my students who are beekeepers and my concern for the declining bee population have led me to start studying beekeeping and trying to work up the courage to keep my own hives.

Heather Trimlett | Glass Design Challenge Winner

Describe your workspace.
I have two workspaces with garden views. The studio is my space for glass work and includes torches, tools, and all things related to fire. Living in southern California has allowed me to comfortably work “outside” in my garage for 20+ years. I like to say I park my car in my studio. From my torch, I have a beautiful view of my front garden.

Heather Trimlett | Glass Design Challenge Winner

My beautiful, bright new office is the second workspace. It’s done in my favorite color combo: lime and turquoise accented with black and white. A large glass door opens onto my garden at one end. I sort beads, make jewelry and take care of paperwork in this space.

Heather Trimlett | Glass Design Challenge Winner

Who or what are your design influences?
1. Color! This is the #1 driver for me. Sometimes I feel like a magpie chasing shiny things. I am constantly aware of the color around me, checking for combinations that might work well with my glass work. I love how bright colors can be in the California sunshine!

2. Order. I love orderly things, mechanical things, symmetry and repetition of line and shape. The fine mechanics and shine of a well-made tool truly inspires me.

Heather Trimlett | Glass Design Challenge Winner

Describe your first jewelry designing experience.
I was born to be a maker of things. I have always sewed, crocheted, built stained glass windows and many other things.

Playing with pop beads as a child was probably my first jewelry making experience. I still think they are a hoot and use them as design inspiration with my students.

Once I found flameworking (making beads at a torch), my career was set. I backed into jewelry making out of a need to do something with the plethora of beads I was making. My jewelry is simple and clean, as well as a nod to my love of symmetry and color. Clean, repetitive simple shapes are my favorite.

Heather Trimlett | Glass Design Challenge Winner

Can you walk us through the set by step process of creating the Spiro Earrings?
The first step in making my Lime Spiro earring is to make the twist that will be the spiral pattern within the earring. I start with one rod of clear glass and three rods of color. I heat the four rods and melt them together. The colors are placed around the clear like the stripes in toothpaste coming out of a tube. While the glass is molten, I carefully twist and stretch it out until it is about the diameter of a pencil and then let it cool. This is my twisted cane.

Next, I begin to create the bead itself. I heat a stainless steel mandrel and a rod of lime glass simultaneously. The size of the mandrel determines the size of the hole in my bead. I carefully wrap one layer of lime green glass around the mandrel as my base layer. Next, I heat the twisted cane gently and carefully, wrapping it around the lime green layer. Lastly, I apply a very thin layer of turquoise glass. I continue to head the bead gently to bring it to its final smooth shape.

I place each finished bead into the kiln to anneal (cool gradually) overnight. For me, the next morning is like Christmas when I open the kiln to see all that I accomplished the day before. I remove the beads from the mandrel, clean & polish them and then assemble them into the Lime Spiro earrings.

Heather Trimlett | Glass Design Challenge Winner

Are there any interesting future projects you would like to pursue?
When I am not on the road teaching or home making beads, my 10+ year goal is to learn battuto, an Italian glass engraving technique.

Creative people all have those days (or weeks!) when we feel lost, unmotivated, or stuck.  How do you keep yourself inspired?
1. I am always charged up after teaching a class. My students give me energy, support and inspiration!  Their questions create new puzzles for me to solve all the time!

2. Glass Bead Yoga. Production work gets me back into the groove. The repetition it requires is calming, feels good and safe, like an old friend. My mind has the space to settle down and regroup, ready for the next design idea.

Heather Trimlett | Glass Design Challenge Winner

Design

Uncommon Design School: Form Follows Function

January 8, 2015

From musical wine glasses to self-filtering popcorn bowls, the distinctive variety of our collection relies on interactions of form and function. Sometimes these interactions are straight out of the design handbook; sometimes, they’re more playful and ironic. Whatever the case, a familiar phrase comes to mind: form follows function. You’ve probably heard it batted around—at a cocktail party or in your undergrad art history course—but you may not know where this quotable bit of design history originates.

Popcorn Bowl with Kernel Sifter | UncommonGoodsThe Popcorn Bowl with Kernel Sifter

Chicago, 1896: a maverick American architect sets out to define an emerging building type that will transform American skylines from coast to coast in the next century—the tall office building, or “skyscraper.” Through a progression of projects, from the Wainwright building in St. Louis to the Guaranty building in Buffalo, Louis Sullivan showed an increasingly clear vision of how the tall office building—a form driven by commercial imperatives—could be designed to reflect its essential nature as a “tall and soaring thing.” At the same time, he put down his pencil long enough to write a sort of manifesto for his skyscraper vision: “The Tall Office Building Artistically Considered.” In this essay was an innocent turn of phrase destined for design school glory: “…form ever follows function.” Like in the old game of “telephone,” this phrase was slightly paraphrased in the retelling, becoming “form follows function,” and a design nerd’s bumper sticker was born.

Prudential (Guaranty) Building | Louis Sullivan

Prudential (Guaranty) Building, Wikipedia 

Not to be outdone, Sullivan’s famous protégé and master appropriator, Frank Lloyd Wright, adopted the aphorism but put his own transcendental spin in it, saying that “[form follows function] has been misunderstood—form and function should be one, joined in a spiritual union.” It’s a prime example of Wright extending his mentor’s principles into his own organic definition of design. But when Sullivan coined the phrase—and when Wright re-branded it—they intended it as an assertion of an aspiration, rather than the revelation of any Platonic design truth.

Frank Lloyd Wright

 Frank Lloyd Wright, Wikipedia

In retrospect, Wright’s insistence that form and function are inextricable stifles his progressive potential. Postmodern design offers examples of form forcing function—one of the main critiques of branded, “starchitect” design of the last few decades. In 2009, Alice Rawsthorn declared the demise of “form follows function,” citing its fading relevance in the age of digital design.* Counter to this obituary, some recent products demonstrate an ironic inversion of the form / function relationship: Lee Goodwin’s Driftwood and Birch iPhone Docks bring unabashedly organic flair to design-for-digital applications, while Jeff Davis’ Record Amplifier draws sound from old records in an unexpected way.

Birch iPhone Charging Dock | UncommonGoods

Birch iPhone Charging Dock

So it seems that Louis Sullivan’s most quotable concept is still on designers’ pin boards today, if only as a platform for playful inversions of his intent.


*NY Times, “The Demise of ‘Form Follows Function’”

Maker Stories

Jewelry Winner Kristin Schwartz Stops To Mold The Roses

November 4, 2014

Design Challenge Winner | Jewelry Design Challenge | UncommonGoods

As you may have learned in our recent Uncommon Book Club Picks, I’m currently reading Elizabeth Gilbert’s “The Signature of All Things,” a novel about a female botanist who seeks to discover and explain the inner workings of the world during Darwin’s era. Alma, the story’s protagonist, is raised in her father’s renowned botanical estate, and spends much of her adulthood studying and admiring the estate’s plant collection. After further examination of the Buds Necklace, Kristin Schwartz’s winning Jewelry Design Challenge entry, I’m convinced that Kristin and Alma are kindred spirits. Like a trained taxonomist, Kristin appears to have studied every curve of the Lapsana flower before delicately molding it to metal clay. I can imagine Kristin with Alma’s microscope, calculating precisely how to add a subtle blue-green patina to her winning pendant. 

Here at UncommonGoods, our buyers love anything that has an exciting story. When Kristin’s story entered our radar, we didn’t hesitate to introduce her handmade collection into our assortment. Kristin’s fascination with her natural surroundings is beautifully illustrated in both her designs and her workspace. Meet Jewelry Design Challenge Winner Kristin Schwartz, and learn about her transition from the corporate world, why she keeps Champagne in her fridge, and how nature inspires her tiny pieces of art.

Design Challenge Winner | Jewelry Design Challenge | Buds Necklace | UncommonGoods

How did you come up with the concept for your winning design?
I take molds of plants for a lot of my work, so I am always on the hunt for tiny plants and flowers that might translate well to jewelry. I knew as soon as I saw this tiny yellow flower it was going to be good. Most of my plant-based pieces have an organic (random) shape, but I thought a round pendant would appeal to more people.

How did you celebrate when you found out that you won the first Jewelry Design Challenge of 2014?
I was inspired by a friend a couple years ago to keep a bottle of champagne in the refrigerator in the event of an unexpected victory or celebration, big or small. Of course I popped it open! And then got back to work.

How did you discover our Jewelry Design Challenge?
I have received the UncommonGoods catalog for a very long time and one day I received an email from the people at Jewelry Design Manager (Bejeweled Software) that said UG was looking for entries for the challenge.

Design Challenge Winner | Jewelry Design Challenge | UncommonGoods

Can you tell us 3 fun, random facts about yourself?
1. Iʼm in my 40s and I love that my Dad still calls me Kiddo.

2. I am not athletically inclined, but I did play soccer when I was six years old. The only goal I ever made was for the other team. It did happen right after half time, so I have to give my kid-self a break.

3. I love collecting shoes, but would rather be barefoot.

What different techniques do you use when creating your designs?
My designs usually start with one question: is it plant-based or is it done completely by hand? Sometimes I have a very specific piece in mind and I just have to figure out how to make it happen. For the most recent series, the image was in my head for YEARS while I mentally worked out the details. It actually turned out better than I had imagined with a combination of hand work and a plant mold. Other times, I see a plant that just needs to be featured on a piece of jewelry. It usually turns out pretty well, but I do have a pile of molds that have never turned into anything. I rarely draw ideas out on paper unless there are multiple elements that require serious problem solving and test runs.

Design Challenge Winner | Jewelry Design Challenge | UncommonGoods

Describe your workspace.
I love my workspace! It was the number one reason for buying my house. Itʼs in my basement, but full of natural light. Through all the windows I am surrounded by trees. And I have a ringside seat to the wrestling matches between my two boxers, Lumen and Kisa (pictured below).

Design Challenge Winner | Jewelry Design Challenge | UncommonGoods

Who or what are your design influences?
All my work is about growth, change and connection. It may not be totally obvious in all my work, but those are the seeds of my ideas. So, of course, nature plays a huge influential role, as do relationships.

Describe your first jewelry designing experience.
It was definitely unintentional. When I was still in the corporate world, I took a four hour metal clay class only because I had never heard of it. I made several pieces of unrelated…somethings, just to get a feel for the process. Jewelry eventually became my focus when I got great feedback on experimental pieces.

Design Challenge Winner | Jewelry Design Challenge | UncommonGoods

Can you walk us through the step by step process of creating the Buds Necklace?
I work solely in Precious Metal Clay (PMC). For those who are not familiar, metal clay is made up of microscopic particles of recycled silver [or bronze or copper]. All those particles are held together with an organic binder. It looks and acts much like modeling clay.

For this piece I took a mold of the tiny Lapsana flowers. Once the mold has cured, I roll a piece of metal clay onto it. I remove the piece of clay and turn it over onto a flat surface. While the clay is still wet I cut out individual pieces (in this case, circles) and let them dry overnight. I then try to get them as perfect as possible by sanding edges and smoothing surfaces that need it. It is much easier and less time consuming to do this with dry clay than it is with metal. When the pieces are ready, they get fired in a kiln. When the temperature reaches 1,650 [degrees Fahrenheit], the binder has burned out and all the silver particles melt together. There is an 8 to 12 percent shrink rate and the result is a fully metallic, pure silver piece. I drill a hole in it for the jump ring. When it comes out of the kiln, there is some fire scale on the surface. That is scratched or sanded off before I put the whole piece into a patina to get the green color. It is then sanded again, leaving minimal color behind. I think the color brings out the texture and design a little more. I wire-wrap a clasp onto a piece of hand-painted silk cord and add the pendant. Tah-da!

Design Challenge Winner | Jewelry Design Challenge | UncommonGoods

Whatʼs your favorite thing that someone has said about something you made?
There was a woman who recently came to my table while I was selling at Pike Place Market in Seattle. I asked how the day had been treating her so far. She sighed and said, “I am so happy to be on front of such a peaceful space with pieces of art I relate to.” She didnʼt buy anything but the compliment was worth so much more.

How do you keep yourself inspired?
Living in the Northwest is great for natural inspiration. I am still amazed at all the different plants that bloom in the spring. I sell my work where 10 million people visit every year. I get to hear a lot of stories. Talking and connecting with people is also great inspiration for me.

Design Challenge Winner | Jewelry Design Challenge | UncommonGoods

What are your hobbies outside of jewelry design and running your own business?
I donʼt really have much time for a whole lot, but I love to cook and work on my house and in my yard. Essentially, my hands are always dirty.

(Photos by Lauren Williams)

Maker Resources

How to Take the Leap from Maker to Entrepreneur

October 15, 2014

Emilie Shapiro | UncommonGoods

Where do I sell my work? Is retail or wholesale better? How do I make work that will sell?

These are the questions I hear all of the time as a jewelry instructor. My students at Liloveve Jewelry School, 92Y, and Brooklyn Museum range from making their first piece to running successful businesses, but all have one thing in common–the need to create something tangible that didn’t exist before.

During my time as the production manager at Pamela Love Jewelry and Allforthemountain, I learned how the jewelry industry works inside and out from handmade one-of-a-kind pieces, small scale in-house production and outsourcing work with United States based factories. Through the years of designing my own collection which is sold at over 50 boutiques Worldwide, I’ve found what works for me.

Emerald Mosaic Ring | UncommonGoods

Where will I Sell My Work?

  • Directly from your studio. The Holidays are a great time of year to have a sample sale in person and/or online to get rid of some inventory to make room for new work.
  • Have a jewelry (or other item) party! Ask a friend or family member to host you and your work at their home or office. Bring snacks and wine and gift your host a piece for having the party.
  • Online – Etsy, bigcartel, your own Squarespace, site and so many more! There are tons of ways to make an inexpensive online presence or website that someone can shop from.
  • Retail Shows – Retailing is selling your goods directly to the public from a fixed location or online. Check out local craft shows in your area. The Holidays are great because people are looking for gifts. Be sure to ask the what the median price point is and what other vendors will be there to make sure you’re a good fit. Also, make sure to have a sign and a cohesive display for your work. Good lighting is a must, especially for jewelry, so make sure to ask about electricity. Don’t forget your business cards or postcards and packaging. (Some of these Trade Show Tips go for retail shows as well.)
  • Wholesale – Wholesaling is selling your goods in large quantities to be resold by other retailers. Set a minimum price or piece order to make it worth your time and so a retailer has a good selection of your work represented. Check out local stores you think your work would fit in with. Who else do they sell and for what prices? Would your work look good next to them? Walk in wearing your work (or pictures of your objects), be very friendly and ask who is the buyer and get in touch. Don’t waste your time or buyers time if it’s not a good fit or price point.

Production

How Can I Streamline My Production?

  • Focus on efficiency of creativity while you’re producing. Perfect your first piece (your model) on design and craftsmanship and then break down each step. Work in an assembly line fashion instead of making one piece start to finish, even if you’re by yourself. You work faster while your body gets in the rhythm.
  • Buy in bulk when possible. Stock up on supplies and materials like chains and findings. Go in with other artists to get the best prices possible.

Materials

  • Develop a clear track for your orders from the second you receive it from when it ships out your door. I use a production schedule which I find really helpful. This helps me keep track of the items I have to make for stores and clients, what I have in stock, and what I have to make.

Production Schedule

  • Think about what you’re great at, and what someone else can do for you. As an artist you want to follow your heart on how you make something, but as a business owner you need to use your brain on the most cost effective way. Try to find the balance and make your work efficiently without lowering your quality.

Jewelry Assembly

What are the Best Tips for Success?

  • Make your own decisions; you’re the boss! Whether you’re hiring an employee, deciding whether a new store is a good (or bad) fit, telling the owner of a store they can’t change your designs (this happens to me once a week – you are the designer), there are tons of big and day-to-day decisions with running a craft business.
  • Find a middle ground. As an artist, you will have the tendency to make decisions based on feelings and intuition. As a successful businessperson, you will need to make decisions based on rational calculation. I like to find a happy medium between the two.
  • When you need help, ask for it. Use the resources of friends, family, and local businesses around you. No one can do everything! Know when to delegate.
  • Be thoroughly professional.
  • Accept nothing less than the highest standards of your work. Never cut corners to make a deadline; your work will suffer and people will notice. Customers buy handmade for good quality products. The goodwill of your customers if your most valuable possession! Don’t jeopardize it by delivering late or shipping work that’s not high quality.
  • Never stop learning!
Maker Stories

Inside the Artist’s Studio with Maggy Ames

October 10, 2014

Maggy Ames | UncommonGoods

One morning a few weeks ago I woke up extra enthusiastic. I couldn’t wait to get to work. That’s because my work day started with a trip into Manhattan to meet an artist whose work I’d loved since the moment I saw it on our tabletop buyers’ sample shelf. I was going to meet Maggy Ames, the maker of the some of the most beautiful stoneware bowls I’d ever seen.

When I got to Maggy’s space, one of the last working corroborative pottery studios in Manhattan, I was happy to see that she was as enthusiastic about the start of the work day as I was. She was ready to start throwing pottery, but she didn’t mind taking a moment to show me and UncommonGoods Photographer Emily around first. We snuck a peek at the kiln room just in time to see a fresh batch of bowls come out, watched Maggy’s team weigh and prepare clay, caught a glimpse at the secret formulas for a few glaze colors, and admired how the clay dust that seemed to touch everything in the studio made the place even more magical.

After our introductions and a little exploring, we watched as Maggy transformed a large, lumpy ball of clay into an exquisitely curved bowl–something she does about 15 times on an average day. Watching the process was certainly inspiring. Talking with Maggy, who’s been making pottery for 30 years and retired from law to became a full-time artist 5 years ago, gave me a much welcome creativity boost too. Whether you’re looking for little motivation to get making, some inspiring words of wisdom, or just some beautiful photos of art in the works, I hope you’ll love meeting Maggy and seeing her studio as well.

Continue Reading…

Maker Stories

Woodworking Winner: Glenn Goes Against The Grain

October 7, 2014

Design Challenge Winner | Woodworing Design Challenge | UncommonGoods  
It’s no secret that we love wood designs here at UncommonGoods, and so do our customers. And because our first Woodworking Design Challenge was such a success with over 100 entries, we decided to host another one earlier this year! Once again, we weren’t disappointed with the heavy amount of amazing entries we received, Glenn Heimgartner’s submission being one of them.

When sifting through the woodworking entries, I knew that Glenn’s Wooden Wrap Lamp (at the time named the Audrey Lamp) would make it as one the semifinalists. Through just a single photo, I recognized Glenn’s solid craftmanship and fell in love with the lamp’s beautiful and simple design. When we finally saw the lamp in person, from the maple veneers to the black walnut base, my prediction of a well-designed, handmade product was proven correct. I secretly wanted to take the lamp into my own apartment and place it permanently on my bedside table.

Meet Glenn – a sustainable woodworker, soccer coach, father of three (who allegedly runs faster than a cheetah), and our latest Woodworking Design Challenge winner! 

Wooden Wrap Lamp
Can you tell us three fun, random facts about yourself?  
1. I went to 4 different high schools in 4 years – including one in Japan.

2. I completed a 30-day expedition in the Yukon – no showers, no laundry for 30 days –undoubtedly one of the most amazing experiences of my life.

3. According to my 6-year-old son and his buddies, I run faster than a cheetah.

How did you come up with the concept of your Wooden Wrap Lamp design? 
I had just finished a long stretch of building large, rather in-depth custom furniture pieces and was interested in changing gears and making something of a smaller scale that was more of a functional accent piece.  Also, I had a large amount of walnut scraps that I wanted to upcycle instead of discard. I had been thinking about the idea of a lamp for a while and figured this was the perfect time, as I needed a holiday gift for a family member.

I had seen other lamps with the general construction of a solid wood base, 4 posts, and a top and always liked the look and feel of light shining through wood veneer shades.  What resulted was the first version of the wooden wrap lamp, which is a blend of modern, arts and crafts, and Japanese design details with a natural, handcrafted feel.

Design Challenge Winner | UncommonGoods

How did you discover our Woodworking Design Challenge? 
We’ve been getting the UncommonGoods catalog for years and my wife showed me the announcement for the challenge in the Winter Catalog – A WEEK BEFORE THE SUBMISSION WAS DUE.  She urged me to submit and I figured since I just made a wooden lamp as a gift for a family member that it would be a good fit for UncommonGoods.  Luckily I was able to set other work aside and get a refined version designed, built, and shipped on time.

How did you celebrate when you found out that you won our Woodworking Design Challenge?
Can’t say I did anything too crazy.  I think I might have given my wife a high-five and then enjoyed a good beer.  Was just honored and excited to know that others out there believed I created something of value.

Design Challenge Winner | Woodworking Design Challenge | UncommonGoods

What different techniques do you use when creating your designs?
For me it’s simple, I start with an idea that needs to meet an aesthetic need and perform a function.  I do most of my design in my head – from the initial concept through fabrication – never stopping the internal struggle until the piece is complete.  I sketch on paper and draft in 3D to explore proportions and details and to solidify my focus.  I usually have a 3D plan to take to the shop and start fabrication.

Once I start to create actual parts, I trust my eye and will deviate from the plan, tweaking various details – thicknesses, proportions, radii of curves, etc. – to arrive at a more finished product.  The piece is completed and sometimes it hits that comfortable balance between form and function – sometimes it doesn’t.  If multiples will be made, I refine and rebuild.  If it is ‘one-off’ custom piece, it is what it is at that point.

Design Challenge Winner | Woodworking Design Challenge | UncommonGoods

Can you walk us through the step-by-step process of creating your lamp?
I go through current inventory of walnut and purchase additional if need be.  I ‘upcycle’ scraps from larger projects when possible.  The selected walnut is milled into various pieces that make up the solid wood frame (2 base pieces, 4 posts, and 2 top pieces per lamp).  Details on the ends of these base and top pieces are shaped via the router and by hand.  Joinery is cut via basic machines and cleaned up via hand tools (base and top pieces are joined via lap joints; posts are joined to the base via mortise and tenons and to the top via bridle joint).

Pieces are glued to make the base and top respectively.  Posts are glued to the base.  Maple veneer is cut and glued in ring shapes to make the shades.  All pieces are sanded and finished.  Rings are glued to posts.  Top is glued to the posts.  Final quality control and touch up finishing is completed.  Nickel hardware and electrical components are installed and light bulb is tested.  Product is packaged.

Are there any major projects, collaborations, or ideas you’re working on now that you want to talk about?
First and foremost, I’m in full production mode in the shop handcrafting multiple lamps to meet UncommonGoods demands for the Winter Catalog!  On the custom furniture front, I’m working with a few private clients designing various unique, functional pieces for residential settings (dining room table, library table, bench for a foyer, etc.).  I’m also in the process of designing and prototyping two more home accent pieces for retail that will be of the same style and materials as the wrap lamp.

Design Challenge Winner | UncommonGoods
Other than making and promoting your woodwork, what other hobbies are you into?
With three amazing small children (ages 6, 4, and 1), I don’t have too much free time for hobbies.  Luckily, my passion of woodworking satisfies most of my self-centered needs.  When I do get a free second, I love the outdoors and exploring the nearby mountains on my own or with others. (I usually do a great one-hour hike right from my shop a few days a week.)  I coach my oldest son’s soccer team and help my parents with their small farm.  I’m fortunate to live in a town that has a great music scene and I see live acts whenever possible.

Design Challenge Winner | Woodworking Design Challenge | UncommonGoods

Where do you get your wood from and is it sustainable?
I have a professional background in sustainable forestry and sustainable wood products, so I am well versed on the land management techniques and supply chain logistics of such material and goods.  I take pride in sourcing responsibly harvested wood from local forests and I purchase from local mills and small sawyers whenever possible.  I mainly work in walnut, cherry, and maple, which readily grow in the forests of my area.

I also have worked in reclaimed chestnut, pine, and oak, which are usually recycled from demolished buildings.  I work to minimize waste in project planning and ‘upcycle’ scraps from larger projects like tables into smaller projects like the wrap lamp.  Shavings are spread on tree/shrub beds that surround the shop and are also composted.

Design Challenge Winner | UncommonGoods

What makes wood products special?
Wood is always alive, whether it is upright in the form of a tree or milled as a beautifully wide-planked tabletop.  I am constantly fascinated by the idea that a tree can function as part of a forest (cleaning the air and water, providing wildlife habitat, and providing an amazing backdrop for outdoor recreation) and then be sustainably harvested to continue its life in functional and beautiful items such as furniture and home goods.

I love that a log can be milled in different ways (rift sawn, flat sawn, quartersawn) to result in different grain patterns and that every piece is different, exhibiting unique details like curly grain, pronounced figure, knots or worm holes.  I always get excited to finish mill a rough piece to see what amazing grain is exposed.  It never gets old smelling and handling this material on a daily basis.

Design

Perfect Popcorn Without the Kernels

October 3, 2014

There’s nothing like a delicious buttery-gold bouquet of popcorn in full bloom.  What could disappoint but the unpopped underachievers lurking at the bottom of the bowl, potentially ruining your movie night with a chipped tooth? In Product Development we often seek a more convenient and enjoyable means of snacking, as evidenced by the fun and functional Ooma Bowl. We planned our next item realizing that, no matter how masterful a popper you are, there are often at least a few kernels at the bottom that make grabbing those last few bites of popcorn a less than grand finale.

Popcorn Bowl

Popcorn Bowl

Our Senior Merchandising Manager, Candace Holloway initially spotted the Popcorn Bowl on Etsy some time back.  The designer, Catherine Smith, no longer made her sifting bowl and had no samples she could share with us. Fortunately, she was happy to license her design, which allowed us to recreate her kernel-catching masterpiece. In the spirit of trial and error, this challenged us to re-engineer the bowl, only having a photo to look back at.

Due to the technical precision required for the ceramic bowl, we developed this as a hydraulic pressed stoneware item. This would allow us to execute a sifter that fit perfectly inside the collection compartment at the bottom of the bowl.

Production

Popcorn Bowl

Our first design incorporated the variable large and small holes we had seen in the original bowls image.  After testing on receipt, we found that the smaller holes were simply too small to fit the unpopped kernels, especially given the minor expansion many of them encountered.  We also found that the lid, having been developed as a flat coaster, did not adequately direct kernels into their holes, as they found themselves resting in the spaces between.  Finally, the bowl was simply not large enough to compensate for a nice, fully popped (well, with the exception of the reluctant poppers at the bottom) bowl of popcorn.  With this valuable insight, we went back to ceramicist to make some much needed changes.

Popcorn Bowl

Popcorn Bowl

A new bowl arrived –larger overall, with all large-size holes and with a domed sifter at the bottom.  We also changed the glaze to something a bit more tactile and unique.  We found, as we made our way through the popcorn, that kernels found their way to the bottom and slid easily along the sides of the bowl or directly onto the lid, passing through the bottom holes as they rolled along.  Deciding on hole size can be a tough process – too large and edible bits of popcorn end up in the bottom compartment, too small and the kernels don’t make it through.

Popcorn Bowl

We were quite happy with where we landed on size – removing the kernels without taking too many tasty morsels along with them.  This Popcorn Bowl did a much better job catching kernels, leaving nothing but delicious, fluffy popped corn for us to enjoy as we celebrated victory with nary a kernel in sight.

Popcorn Bowl