Browsing Tag

Home Decor

Gift Guides

Four Elements Mood Board: Air

April 15, 2014

Four Elements Mood Board: Air | UncommonGoods

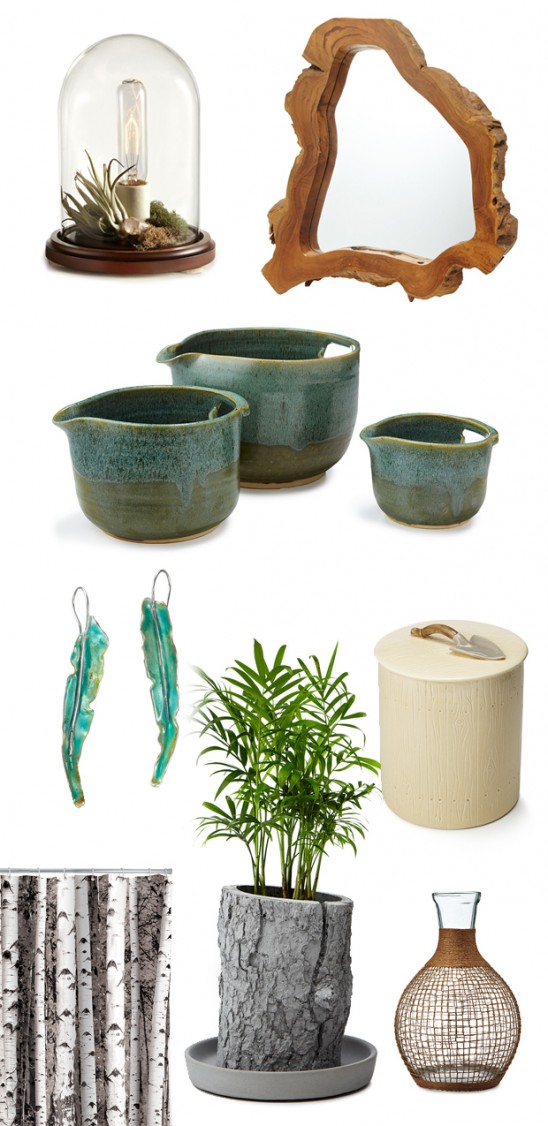
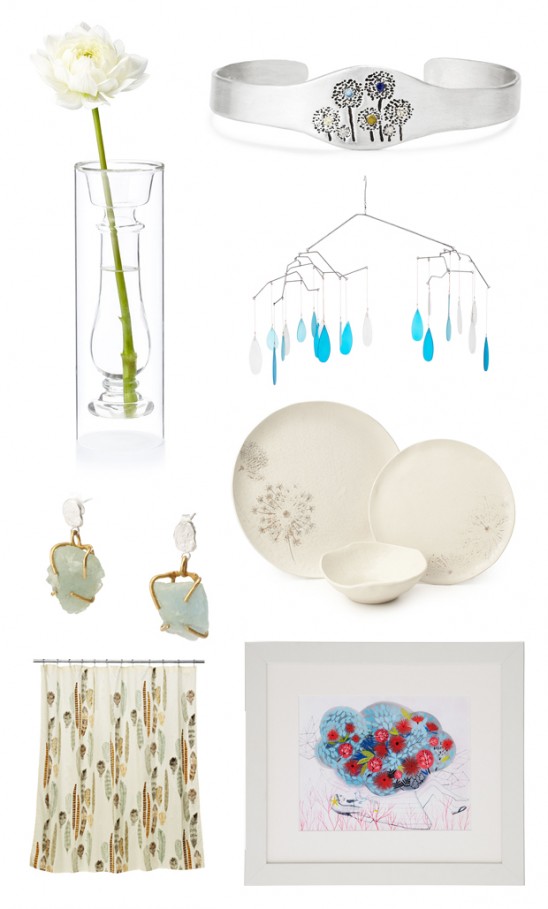
Illusion Vase / Sterling Silver Dandelion Cuff / Glass Raindrop Mobile / Queen Anne Porcelain Dishware Collection / Spring Cloud by Betsy Walton / Floating Feathers Shower Curtain / Raw Gemstone Earrings


For this collection of items inspired by air, I wanted to find UncommonGoods designs that evoke the movement of wind and the tranquility of the sky. We aren’t always aware of the air around us but when we’re stroked by a gust of wind or blow on a ripe dandelion, we can see and feel the presence of this natural element.

These home and personal accessories are designs that remind me of our atmosphere and give us a bird’s-eye view of this beautiful element.

Check out another collection of jewelry and decor inspired by the Earth.

Gift Guides

Four Elements Mood Board: Earth

April 8, 2014

Earth-inpsired home decor & jewelry | moodboard | UncommonGoods

Terra Table Lamp / Teak Root Mirror / Nesting Stoneware Mixing Bowls / Enameled Silver Leaf Earrings / Gardener’s Compost Container / Birch Forest Shower Curtain / Apple Bark Planter / Recycled Glass Bali Round Vase

Whenever winter comes to a close and spring rears its head, we all begin to notice nature a lot more. Our walks become just a little longer so we can steal a glimpse of trees and flowers. All of a sudden, getting out and facing the elements transforms from a daunting experience to a pleasant one.

In celebration of the end of a rough winter, I’ve put together some gift guides inspired by nature and its four principle elements, and decided to start with the element we come in contact with every day, earth.

This collection of home accessories, pottery, and jewelry were all inspired by the nature found on a walk through the forest. Crusty tree bark, rugged live-edge wood, curled leaves, and woven straw come together to tell a story of designers touched by Gaia in their creative process.

Check out my picks inspired by Air on 4/15!

Maker Stories

Inside the Artist’s Studio with Cassidy Schulz Brush

February 2, 2014

IMG_0452

No matter how much I prepare before a Studio Tour, I never know exactly what to expect when I step into a creative workspace. On the way to my most recent artist encounter I traveled up New York Avenue by bus, out of my own Brooklyn neighborhood and into a close by, but unfamiliar, area somewhere between Bed-Stuy and Williamsburg, I wondered what I’d see when I arrived at Cassidy Schulz Brush’s studio, Urban Chandy. After getting off at my stop, I wandered down a street that seemed to be a mix of industrial and urbane. I walked past warehouses and large trucks making deliveries, but also passed several people who looked like they could be on their way to art shows or coming from trendy coffee shops.

When I entered Cassidy’s studio, I found that same juxtaposition of city chic and industry. Of course, it’s what I should have been expecting all along, considering that Cassidy and her team so beautifully combine mechanical elements (like wires, sockets, and bulbs) and gorgeous reclaimed materials (like barn wood or vintage ceiling tiles) to create her chandeliers–or chandies, as she calls them.

The space is lit by a combination of sunshine pouring in large windows and the exposed bulbs hanging from its many chandies. Stacks of wood, various tools, and spools of wire line most of the walls there, and the remaining wall is covered in chalkboard paint and filled with chalky lists and numbers. Surrounded by so many details, I felt like I could explore the studio all day examining the many combinations of old and new. Here’s a closer look inside Urban Chandy, and some great advice from Cassidy Schulz Brush.

Continue Reading…

Design

How To Make a Vegan Dream Catcher

October 30, 2013

I am pleased as punch to share my DIY dream catcher tutorial on UncommonGoods! I work for a public relations firm called Small Girls PR, and we recently threw a party for our client, She and Reverie. At the event we had a dream catcher craft station and provided the guests supplies and tips on how to make their own whimsical piece during the party! I’m a big fan of UncommonGoods, and wanted to share with their design community how easy it is to make one with just a few supplies. And just to add a cherry on top, knowing that UncommonGoods’ is very animal friendly, I created a fun vegan dream catcher tutorial! Below are photos and step-by-step directions for you to start making your own right at home!

Supplies


Step 1

Step 2

Step 3

Step 4

Step 5

Step 6

Step 7

Step 8

Step 10

Step 12

Step 13

Remember, you can substitute the supplies with any other arts and crafts you may have lying around at home. For example, if you don’t have felt feathers, perhaps you can use tassels or jewelry pendents. And if you don’t have faux suede you can switch it out with bright ribbons or earthy hemp cords. Have fun with this project and be creative! Below are a few snap shots from the She and Reverie event with the guests having a little bit too much fun making these dream catchers. SheRev082413_PiOv_090 SheRev082413_PiOv_057 SheRev082413_PiOv_055 SheRev082413_PiOv_053 SheRev082413_PiOv_020

Inspired, but don’t quite have the time to build your own dream catcher? Check out UncommonGoods’ Dream Catcher Necklace.

Design

Home Is Where the Design Is

October 24, 2013

As a fashion blogger at Kita Moda, I believe details and accessories are imperative. But this golden rule doesn’t just apply to my wardrobe, it’s important for my apartment’s design and atmosphere as well.

Kita ModaI moved into my own place about a year ago and over the recent months I’ve spent lots of time getting rid of my college Ikea furniture and replacing everything with sustainable pieces made for big kids. But of course I need stellar pieces to accentuate the fine furniture, right? This is where my obsession with UncommonGoods comes in. Every single one of their home decor items is a conversation starter. Packed with loads of color and unique textures, each piece appears to be from a far-off land making my home a bit like a well-curated mini museum. If you’re searching to brighten up your home with function and beauty, look no further. Take a look at some of my favorite pieces.

For the kitchen: A festive recycled glass pitcher and matching margarita glasses are a must for any party! My boyfriend appreciates the tastes of tequila, and I, sangria. And for when you’re not planning a party? These colored glasses inspired by Brazilian Agate will do just the trick.

Kita Moda For the living room:A beaded picture frame stands out against more basic wooden or metal frames. I love how these colors pop against all the white.

Kita Mod These Agate Coasters will make you and your guests want to use them. I like to leave them stacked when they’re not in use, almost as a mini sculpture.Kita Moda Architectural bowls make such terrific centerpieces. I’ve had my bronze Kelly Wearstler-esque one for quite a while but if I were to to replace it, I’d look to the Satellite Bowl. The stark black and clean lines just make such a statement.

Kita Moda For the bedroom: My entire bedroom is covered in jewelry. My dresser looks as though it’s in preparation for an editorial run-through with trays and bowls and cases full of pieces. My vanity and each and every shelf is the same way, covered. I simply need a closet dedicated to jewelry but until that miracle happens, practical jewelry boxes will have to suffice. One of my favorites actually matches the aforementioned beaded frame and it’s full of compartments inside.

Kita Moda And of course, let’s not forget about the art.

Kita ModaIt was a bit like love at first sight when I spotted this Green Poppy Love Chair by Kate Lewis. It’s currently on my wish list, lets hope Santa comes through this year. It reminds me of a vintage dress my aunt from Greece recently gifted me, proving yet again, how seamlessly fashion and design go hand in hand.

Remember, it’s all in the details, so click here for more unique home decor ideas to add to your own wish list.

Gift Guides

Gift Lab: How to Keep Plants Healthy While You’re Away with the Self Watering Planter

October 23, 2013

Jen | UncommonGoods

Research
I travel a lot and my plants tend to suffer because of it. Turns out it’s easier to find someone to take care of cats than plants – probably because the plants don’t complain as loudly as the cats do. Over the years I’ve tried a bunch of gizmos to get the right amount of water to the plants, but they were all either ineffective, the wrong size for my plant, or just plain old ugly.

Hypothesis
Let me be the first to say that I was skeptical about this planter. It was a good size and attractive, but it seemed too good to be true. The last of my non-succulent plants just died (thanks, cat-sitter), which meant that this was going to be a long experiment. Armed only with slow-drinking succulents, I took a chance on this planter.

Experiment
May 2013: I got my materials together: some succulent planting mix, some decorative rocks, and some new succulents from my favorite store. I took the lid off of the water compartment to check it out, but neglected to put it back on when I started filling the planter with planting mix. Lesson learned: put the lid on because that planting mix goes everywhere and it’s really hard to remove from the water reservoir.

Self Watering Planter With Succulents | UncommonGoods

June 2013: I hadn’t checked the water in a month but the plants looked happy and healthy. The water level had definitely decreased, though it was hard to tell whether this was from the planter soaking up the water and it evaporating, or if the planter was delivering water to the succulents. I filled the reservoir and went on vacation for 3 weeks without leaving watering instructions for the cat-sitter.

Succulents | UncommonGoods

July 2013: I came home to find that (a) the cats were fine and (b) so were the succulents. They were larger than they were when I left and the water was about half gone. I was starting to become a believer.

Growing Succulents | UncommonGoods

August 2013: Baby succulents began popping up – this was the clearest sign that the planter was delivering water as promised. Another sign that the planter was working: the succulents that I hand-watered were all near-dead from over-watering.

Beautiful Baby Succulents | UncommonGoods

Conclusion
1. This planter actually works.
2. The planter has got to be much more impressive with something that needs more water. I’m going to get another one and try to grow some herbs.
3. Put some little plastic feet at the bottom of the planter to raise the planter a bit above the windowsill or table it’s sitting on. I found that the water in the reservoir affected the paint on my windowsill.

Design

3 Easy Steps to Make A Necklace Display

October 17, 2013

Hey you jewelry lovers, I’m Christina from Tales From The Thrift. I’m so used to showing off all my thrift shop finds that sometimes I forget to blog about the projects I conquer when I’m not vintage hunting! Naturally, my projects usually have something to do with actually organizing all of my random finds. Like a lot of other jewelry hoarders, I’m shockingly bad at storing my treasures, almost to the point of embarrassment. Every piece I own — from the fancy gems gifted by loved ones, to my huge collection of thrifted trinkets — gets stuffed into old jewelry boxes and dusty pouches or tossed haphazardly onto my nightstand before bed. Obviously, this strategy leads to plenty of tangles, tarnishing, tears, and loss. But finally, after one missing earring too many and some minor soul-searching, I realized it was time to become a responsible jewelry-owning adult and embark on my first-ever DIY storage project.

Tales From the Thrift

I kicked off my mission with a plan to create a simple display for some of my favorite necklaces. I began scouring a few local thrift stores and stumbled across some wood-framed, canvas art pieces–one black with silver handwriting, and the other with an abstract floral print–at Goodwill. (I ended up abandoning the floral canvas, and sticking with the black/silver piece, which features a poem by Elizabeth Bishop. If you’re curious, you can read it in full here!) I scored both items for around $4.

Tales From the Thrift
What you need: Other than some old wood-and-canvas artwork, just some nails and a hammer.

Tales From the Thrift
Step 1: Hammer your first nail at the top/center on the front of the wooden frame. Make sure you keep the nail exposed by at least a half-inch.

Tales From the Thrift

Step 2: Hammer a few more nails in a similar fashion, evenly spaced on either side of the middle nail, so you end up with a nice, balanced row.

Tales From the Thrift

Step 3: Put the display on your dresser or hang it on the wall, and arrange your necklaces. Enjoy a life free of tangled jewelry.

Tales From the Thrift

For rings, earrings and bracelets, I supplemented my DIY display with a few handmade jewelry stands and holders from UncommonGoods. UG’s gorgeous Hand Of Buddha Stand is perfect for my “real”  jewelry that I wear daily, and I added a light blue Pedestal Holder and pewter Labyrinth Bowl to hold my other assorted baubles.

buddhahand


Tales From the Thrift

Tales From the Thrift

Of course, I still have plenty of jewelry stowed away and out of sight, but my DIY display definitely helps me keep my most-loved necklaces organized and easy to find. And best of all, my new set-up is as pretty as it is practical!

Tales From the Thrift

Maker Stories

Thomas Both & The Art of Tableless Dining

October 14, 2013

Thomas BothMix and mingling at cocktail parties, couch lounging on movie night, and eating Sunday breakfast in bed just got a whole lot easier with Thomas Both’s Ooma Bowl design. “It struck me that all the plateware we use is designed for tables, yet often we eat without a table.  So my point of view was to design something that is suited for eating without one, and to do it in an elegant way.”

Thomas earned his BS in Engineering at Harvey Mudd College and shortly after worked as a mechanical engineer for three years.  Yet as a person who was a bit more right-minded, Thomas recognized that he held a creative heart, and wanted to finally wear it on his sleeve. He was admitted to Design School at Stanford University, which paved his way to teaching innovative designs at the Hasso Plattner Institute of Design. “Now, I work much more as a designer than an engineer, but both play a part.”

Thomas BothObserving small living spaces was how Thomas’ inspiration behind the Ooma Bowl came about. After speaking to people living in small apartments he was inspired by the idea of tableless dining. Thomas realized that most non-table plateware lacked a level of elegance, such as bad TV dinner trays or strange party plates. Soon, he turned these discussions and observations into a real life design solution.

oomabowl hospitalThomas believes that a strong perspective helps design a unique product.  He didn’t want to just make a cool looking bowl; he wanted the design to be tied in with a direct purpose. In the early stages of designing the bowl, a friend of Thomas’ broke his leg and was stuck in the hospital for a quite a while. Because the Ooma Bowl was “a bowl that’s designed to be held” without the use of a table, Thomas took this opportunity to have his bedridden friend become one of his first experimental guinea pigs. “I called him up. While everyone else was checking if he was okay and visiting him, I asked him if he’d test out my prototypes. He liked the feeling of being locked into the bowl, not holding it but the bowl holding you.”

Thomas brought his designs to the next level of actual production. At first, he had no experience with ceramics. “Except maybe in grade school messing around with clay. It was a dining design project that just so happened to end up in a ceramic piece.” He had to learn about slip casting, working with clay, glazing, and firing all at once. After rough prototype after rough prototype, including failed plastic forming attempts, Thomas finally made the first buck out of REN shape into two pieces. “One side on a lathe, and the other just sort of by eye and feel.” He then glued the sides’ backs together and made adjustments. The next iteration he worked on was stacking and getting a nice feel in the hand, which was much more work than he ever anticipated.

thomasboth2

thomasboth3Once the design was perfected into its brilliant form, Thomas found a manufacturer in Los Angeles, but just as it was a difficult process to design the perfect bowl, it was probably an even more nerve racking time to manage the products. “Selling and managing production, storage, sales, and shipping is a lot of work. I had way too many boxes in our living room for a long time. That part wasn’t so much fun for me; it was more of an on-going nuisance.”

Yet, after only a short hiatus, Thomas is proud to see that the Ooma Bowl sought its way back out into the world, licensed, and it’s now an exclusive item on the UncommonGoods site. Sarah Stenseng, our Senior Product Development Associate who attended Stanford with Thomas, worked with him to get the Ooma Bowls back into production. Thomas says, “The Ooma bowl would probably still be sitting on the sidelines if it wasn’t for UncommonGoods.”

thomasboth4 Thomas’ advice for designers who are producing a product from just a simple idea is to “get engaged and excited about how people do things and how they think within a certain domain , and pay attention.  Opportunities will emerge.  Then you have to try things.  Make stuff.  It can be crappy, you’re just working on the concept. Work your way to a product idea that you’re excited about and other people love.  Then you can bring more refinement to it and move toward manufacturing.”

Thomas Both