Browsing Tag

Home Decor

Maker Stories

Inside the Artist’s Studio with Jeff Knight

September 3, 2013

UncommonGoods Artist Jeff Knight

The moment I saw Jeff Knight’s Nimbus Cloud Serving Board in our Woodworking Design Challenge I started rooting for it. I love the combination of sturdy, yet beautiful, hard maple and the whimsical cloud shape of the board–and the little raindrop serving trays are the perfect finishing touch to make this simultaneously playful and functional piece truly uncommon. When I found out that Jeff is from my hometown, I crossed my fingers a little harder, even though I was pretty confident our voting community would make sure the design made it to the final round. In the end, our community and our judges agreed with me that this wooden work of art was perfect for our assortment.

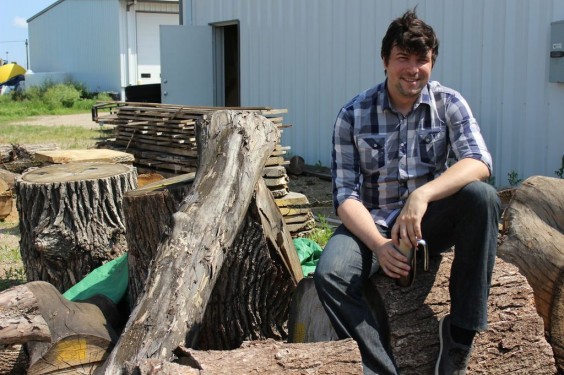
Since I happened to be planning a trip back home to Fargo, North Dakota, I HAD to jump on the opportunity to see where this winning design was born. Upon my arrival Jeff, in true Midwestern fashion, graciously welcomed me into his wood shop, offered up coffee, and gave me a tour of a beautifully sawdusty space called DIY Wood Studio, a shared woodworking environment filled will tools of all sizes, projects in the works, and a lot of inspiration.

Continue Reading…

Design

6 DIY Projects For Your Home Sweet Home

August 8, 2013

I recently moved into an adorable brownstone in Brooklyn, and as much as I love my faux fireplace against a brick wall and my fabulous French double doors, I admit that my white walls are currently screaming for attention and my shelves are yearning for some sweet, sweet lovin’. Before I moved back to NYC, I was traveling for a few years and I never got a real chance to make my home a real home that reflected my personality while living abroad. This was due to the fact that I was either stuck inside a tiny chambre de bonne in Paris or my toilet was less than a foot away from my shower-head in South Korea. (Yes, everything got wet whenever I showered. I still shudder when I think about it.) One of the reasons why I moved back to the states was because I wanted my love of home décor to go beyond the limits of the space of a shoe box, and to ignite my dying creative spirit through endless tribal-print toss pillows and painted mason jars. Now that I’m finally in a decent sized apartment, it’s time to tackle a few do-it-yourself projects to spruce up my living space and to finally cross out “Decorate my home to make the holy Martha Stewart jealous” off my bucket list. Below are my top 6 ideas I’ve found online (AKA: procrastinating on Pinterest) that I hope to complete before the end of summer. They’re fun, easy, and won’t break the bank!

Wine cork magnets

1. Wine Cork Magnets – For my severe love of red wine and DIY projects that take under 30 minutes to complete, these wine cork magnets made it to the very top of my list. I open my fridge every day, and even though half the time the inside is empty, at least these adorable wine corks will have me feeling quite sophisticated. (And okay with myself that the groceries weren’t done for the week.)

Continue Reading…

Gift Guides

How to Create Your Dream Wedding Registry

May 20, 2013

Not to sound overly girlie or cliché, but getting engaged was absolutely one of the happiest, most blissful moments (weekends) of my life. And sure, now five months later I am entirely wrapped up in comparing caterers and photographers and yes trying on many, many white dresses and making many, many decisions (who knew there were so many decisions to make?). It’s been a total blast. As it turns out, I love planning! Now, that’s not to say I haven’t had my moments – total emotional breakdowns/spazz moments … I am somewhat comforted to know that I have found this to be a shared experience among just about all my engaged/married friends. (This is a highly emotional time, people!) but I am getting better at thinking big picture and turning any moments of stress into excitement. I think by the time our wedding date rolls around, I’ll have this down to a science. Until then: lots of deep breaths, long runs and on certain nights: copious amounts of wine.

Katie’s Uncommon Registry board on Pinterest

As for some of those details – while we are taking some liberties with certain “traditions”, building a registry was one of the most fun projects I have worked on during this flurry of planning – and we approached this in a somewhat traditional sense – all while infusing our personalities into it from bottom to top. I have been to enough weddings in the past 2-3 years to see several approaches to registries, and being in the retail business and overall a product-passionate person, I am at somewhat of an advantage as to knowing what is in the competitive landscape for products. Here are some tips of the trade and from my experience that might be useful for anyone who is just getting started in this:

(1.) SET UP MORE THAN ONE REGISTRY:
We tried a few different approaches, and in the end, we chose to register with four different sites. We wanted to make sure we gathered the best products from the best sources to match our taste and needs, rather than trying to retro-fit into one or two retailers who might not have exactly what we wanted. Not to mention, a lot of traditional retailers don’t carry the really unique, wow items to add personality into your home. I also really love when my friends register at a few different places, so that I can mix and match gifts and price points to give them what feels like a cohesive package of goodies.

The first place we registered with was the service Knack. We used this to pull in items from sites that did not have their own registry or if there were not enough items on the site to rationalize an entire registry. I had used Knack for friends’ registries and found it exciting to see items aggregated from funky, smaller stores. I liked that it opened up the market for registering outside of traditional retailers, but the checkout process was somewhat laborious to use. (E.g.: to purchase an item, you click into the item page from the main registry page, select “Buy Now” – which then takes you to the separate retailer site to purchase. Once you purchase it through the other retailer (and have to enter in all address information, etc), then you have to click back to Knack to tell the service you purchased it. Not the easiest, I did not check out correctly the first time I used it and I consider myself a pretty tech-savvy person! After imagining some of the less tech-savvy folks in our life trying to use this service, I decided to break out what I could onto separate, more traditional registry sites.


Your wedding registry is an opportunity to show off your style and point to the “wow” items you’re dreaming of.

(2.) ASK FOR HELP!
After building out registries which solved for pots and pans, plates and cups, coffee makers and cookbooks, I thought I had thought of everything. Well, thankfully, I sent our registry links around to my mom, sister-in-law, and my fiancé’s mom. Definitely ask around, while there are tons of wedding planning books and websites, I found getting advice from the people who know us best to be the most helpful. They knew we didn’t need overly ornate plates or silver serving pieces, but they also jumped on the fact that I had missed sheets and towels and silverware.

(3.) MAKE SURE TO GET YOUR PARTNER’S SIGN OFF
Building the registry was something I decided to take on and consult with my partner after I was more or less finished. I built out the above described registries, added the links to our wedding website, and before I knew it our family and friends were jumping on items as engagement gifts. (What a lovely surprise!) Luckily, my fiancé and I definitely share a similar taste level and aesthetic so I was not too far off. However, once I saw people starting to buy items, I decided I ought to run the registries by my fiancé. The process of editing was funny, while I tried to pretty much stick to the essentials, I may have tried to slide in a few decorative accents that he quickly and swiftly gave the axe (a handmade bell, Katie, really??). So, make sure you are BOTH on the same page to avoid glares from your one and only after the wedding.

Overall, building a registry is a super fun project; I think this is because it allows you to start picturing what this next phase of our life might look like. Sure, we have lived together for going on 4 years now and have stocked cabinets, but our kitchen is largely a patchwork style collection of cast off odds and ends from our moms’ kitchens (happy to clean out their pantries), plates we picked up from the free shop at a oft-visited dump in New Hampshire, and–most notably–our collection of pots and pans from a particularly successful yard sale day. For two people who love to cook and entertain, curating a collection of items to use on a daily basis was an exciting foray into – dare I say – true adulthood. Because really, I think it’s when you own your first Cuisinart that you can call yourself an adult. But it was during the selection of goods that I realized we could hand pick the items that we would use not only to use to heat up soup on a typical Monday night of netflix-marathon watching, but to make our home with, to serve holiday dinners with our families, and in someway, to define who we are as a couple and how we want to make our home. That being said, I believe our kitchen, and our home will always be a patchwork of odds and ends, but at least now we might have matching tops to all our pots and a functioning coffee maker!

My biggest words of advice: Make it about who you are as a couple. If you never bake, don’t register for bake ware; if you aren’t the formal type, register for some high quality, but funkier versions of things – everyone needs plates to eat off of, you don’t need to go for the super expensive kind if they don’t suit your lifestyle. The rules have changed a lot, embrace the freedom to build your home together and have fun with it. When in doubt, consult your family and friends for help, they will love it!

Get your registry started at UncommonGoods!

Design

The Dos and Don’ts of Setting a Table

May 20, 2013

Growing up in a big Italian family, the dinner table was the hearth of the home. It was where everyone gathered during get-togethers or parties, whether or not there was a formal meal set down. As an adult I love having my friends and loved ones over to feed them but so far all my meals have been spread across a small apartment with plates on laps. However I spent enough time setting tables between stirring my grandmother’s gravy (tomato sauce!), reading my mother’s hip-high pile of Martha Stewart Living magazines, and the studying the copy of Emily Post that I bought at a yard sale when I was 12 to consider myself an expert in-the-making in the art of table setting.

Since I don’t have a big rustic table of my own, I have been living vicariously through my newly betrothed friends and have been dishing out dinner party advice. Here are some Do’s and Don’ts I have put together from years of research.

DO mix and match different styles of plates – a great way to hide the fact that you might not have enough of one style for everyone at the table!

DO give everyone at the table all the plates and utensils they will need for the entire meal… unless your butler is there to change each place-setting between courses. This means soup spoons, salad forks, any utensil they may need for dessert.

DON’T put out dessert plates until the dessert course. It’s everyone’s favorite part anyway so save all the surprises for later.

DO learn the basics of place-settings so you can bend and break the rules for your own meals and style.

Some basics: Utensils are set from in the order they will be used from the outside in. This means the fork to the far left is your salad fork; the one inside is your dinner fork. The spoon to the right of the knife is for soup, a course that comes before dinner. Forks on the left, knife on the right as it’s proper etiquette to hold food down with the fork on your left hand as cut with the knife in your right, then switch the fork when you are ready to eat.

DON’T choose a centerpiece with an overpowering aroma. Stay away from scented candles and very fragrant flowers. You don’t want the décor to upstage your amazing meal.

DO make sure that centerpieces allow guests to see across the table to keep the conversation flowing. Nothing is worse than having to talk to someone’s forehead over a ridiculously large flower arrangement.

DO get funky with your napkins. Fold them, roll them, or use a pretty ring. Napkins can really tie a whole table together.

DO provide your guests with a water glass and another for the alcohol being served with dinner. If you are offering white and red wine, choose a versatile glass.

DON’T play music that will stand out. Like your centerpieces, the music should be noticed but not enough to offend or distract. Try something without lyrics – Pandora has a lot of instrumental options that don’t sound like elevator music.

Design

Trend Spotting: Kantha Quilting

April 24, 2013

We recently introduced Kantha Blankets to our assortment and I couldn’t be more excited to bring these to our customers. These eclectic, one-of-a-kind quilts each have a special story to tell while brightening up any room. I thought it would be fun to share a bit about the history of Kantha as well as some fun decorating tips.

Decor8, Celadon, Desh Crafts


Kantha, a word meaning “old cloth” or “rag”, refers an age-old art form traditionally practiced by the women of Bengal. Kantha blankets are made from recycling worn saris originally intended to keep warm during the cooler months. In the traditional Kantha style, five layers of used saris are sewn together with a single running stitch to make a quilted blanket. Once the blanket is finished, Bengali women “sign” their pieces with their name, a mark of pride and identity. Such blankets are passed on as heirlooms to future generations. While this tradition dates back to the late 16th and early 17th century, Kantha is still the most popular form of embroidery practiced by rural women. Aside from providing a source of income for Bengali women, the popularity of Kantha products has given this traditional folk art a stake in the modern global marketplace.

Justina Blakeney, Apartment Therapy


Nowadays, this age-old tradition is finding its way into modern home décor and design. Traditional Kantha is used on a wide array of products, from personal accessories, to pillows, and upholstered furniture. No matter what the execution, the unique, one-of-a-kind nature of this traditional folk art is a show stealer. Each piece is unique and one-of-a-kind and you can truly see the fingerprint of the artisan women who created them.

Hand & Cloth, Justina Blakeney, Anthropologie


I see Kantha as an easy way to incorporate a little colorful, bohemian touch to your living space. Suddenly you can integrate a splashy touch to your otherwise monotone bedding; the blanket, casually strewn over a couch or chair can transform the look of the room to that of one occupied by a world traveler and collector.

Design

Constellation Collaboration: Creating the Zodiac Pillows

April 15, 2013

All great designs start out as great ideas, and while we often think of great ideas as masterpieces that burst forth from the minds of individuals, in reality, many are actually the product of collaboration.

For our product development team, collaboration has a major part in creating dynamic new goods. Sometimes the idea for a new exclusive designed-by-us product is conceived in a brainstorming session, sometimes it’s the result of discussions with our buyers, and, as in the case of our colorful Zodiac Pillows, sometimes the idea is built around existing artwork.

Senior Product Development Associate Sarah Stenseng, Product Development Associate Tiffany Jyang and their zodiac characters

Before our product development associates Sarah and Tiffany got to work designing these plush pillows, the adorable astrological characters featured on them started out as illustrations by artist Mark Poulin.

“Mark’s artwork informed the materials,” said Tiffany. “The characters are bright, fun, and colorful, so we knew the product had to be huggable.”

Mark agreed that UncommonGoods had to take his designs in the “huggable” direction. “It was all about the cute,” he said when asked what (besides the zodiac symbols themselves, of course) inspired him. He continued, “My goal was to make cartoon characters that would appeal to anyone with a heart and with a sense of goodwill. After all, you do have to feel comfortable snuggling up on the couch with these guys!”

Since there are 12 original zodiac signs, the team knew they had to create a product that could be consistent across several styles, while letting each character’s personality shine through. They decided that pillows were the perfect way to display Mark’s creations, because they are soft, squeezable, and fit into a variety of home decor styles.

“Part of what makes these zodiacs uncommon is that they are lovable, which isn’t something you usually think of when you think astrology,” said Sarah.

Mark himself jokes about his own feelings about astrology. “Secretly I’m a zodiac fanatic,” he said. “Not the reading the columns kind of guy, but the always trying to guess peoples signs based on their behaviors kind of guy. There’s nothing wrong with a little astrology mixed with numerology and maybe a dash of tarot, as long as you don’t talk about it in interviews…whoops!”

Artist Mark Poulin

That idea of blending the symbolism of the zodiac characters into everyday life was also a factor in creating these pillows. The team wanted the youthful series to appeal to fun-loving folks of all ages. And, since they really are functional pieces, that look lovely on your bed our couch, but are also soft and comfy when you rest your head on them or snuggle up with them, they had to be durable.

Fortunately, Tiffany and Sarah didn’t have to look far to find a vendor who could produce quality plush products. UncommonGoods has worked with Green 3 for years, and knew they were a great choice to help take the zodiac pillows from a concept to an uncommon good.

This next level of collaboration started with Jim Martin, who co-founded Green 3 with his wife, Sandy. “Our reaction to the designs was positive as soon as we saw them,” Said Jim. “We liked the icons and felt that had a very modern feel. We also really loved the saturation of colors.”

It was important to Jim and the team at Green 3 that the artwork was reproduced faithfully, without limiting the usefulness of the pillow or making the price point too high.

Zodiac Pillows in production, photos courtesy of Green 3

Since these factors are also important to our product development team, Tiffany and Sarah worked closely with the other collaborators creating mock-ups, working out kinks, making needed tweaks, and striving to hit a deadline–motivated to get the product perfect in time to appear in our next catalog.

The team also reached out to our online community, through the community voting app, to get feedback before releasing the final version of the product.

“We saw a fair amount of positive comments, ” said Tiffany, “which helped us gauge customer reaction to the product.”

Our product developers were encouraged by kind words from our voters, and couldn’t wait to see the finished pillows, and when the first shipment came in, they were both relieved to see that the product was finally here and excited to be able to start getting the cuddly characters out to customers.

Although seeing a product like the Zodiac Pillows through from an idea inspired by charming artwork to a tactile piece does involve a lot of moving parts and collaboration, it’s definitely worth the time and effort to see the end result–a design that can’t be found anywhere else!

Gift Guides

Gift Lab: The Levitron Lamp’s Floating Fluorescence

March 20, 2013

Rocky tests the Levitron Lamp | Uncommongoods

The Levitron Lamp in action. Read on for Rocky’s Step-By-Step floating lamp tutorial.

Research
I remember it like yesterday..

About 6-7 weeks ago I’m sitting at my desk, headphones on, Spotify playlist blasting, putting in work on the current task at hand. I get to a point where I feel like a mini break is warranted and decide to relax a bit, sinking into my chair and mentally preparing myself to go full on into daydream mode. However, right before I get the chance to picture myself on a foreign beach, drinking margaritas out of umbrella decorated coconuts, something catches my eye…

Sitting on a shelf behind the neighboring desk to mine, there is a fairly large box with “Levitron Lamp” in bold print, accompanied by a photograph of a lamp underneath … I think. Why the uncertainty? Because according to the picture I’m now staring at, the lamp’s shade that sits on top, actually doesn’t “sit” at all, but FLOATS. Yes.. I’m sure now. There is definitely a minimum of 1-1.5 inch of space between the lamp’s shade and its base, with nothing connecting the two..

W. T. F. ?

See, working at UG for about a year and a half now, I’ve grown accustomed to expecting the unexpected when it comes to the products we carry. Time and time again, I find myself floored by the level of creativity and innovation applied. So much so, that I’ve made myself a permanent resident in the Merchants’ area of our office so I can scope out the samples of potential new products as they come in. (Marketing team, I promise I love you guys.. but yes, I have something on the side with the merchants.) Needless to say, this just became another time to add to that list of ‘time and time again’ I mentioned earlier.

*Pauses music. Snatches off headphones. “KATIE.. What.. is… that?!”. *

Katie (UncommonGoods Associate Buyer and my desk neighbor) informs me more about the newly received lamp and confirms that it purportedly does have floating pieces incorporated, although no one has yet to see it with their own eyes. Then after a brief pause, she adds…

Hypothesis
I have to assume that because someone out there took the time to mass manufacture, officially name, professionally package, and ship this product to our office, there is some truth about what it claims to do. However, I’m suspicious about how well it will work and for how long. My past experiences from life teach that often, things like these don’t stick around for very long, once out of the box and put to continuous use (and of course, that doesn’t fly at UG). That said, I’m predicting ‘oohs’ and ‘ahhs’ for a short-lived amount of time before it becomes a has been.

Experiment
Setting up the lamp is fairly simple, just pay close attention to the directions, because between the different parts to the lamp and the various laws of science at play, there’s a chance of some confusion if you do not. Take it from me–I admit, at first I quickly threw the directions right to the side and had at it.

It took 1 minute and 20 seconds for me to pick them right back up again… which brings me to

STEP ONE Use the directions to identify all the pieces.

You see that first picture on the left up there? Take a real good look at it. It identifies all the pieces you will need to put the floating lamp into play and gives you the ABCs of what goes where, when, and why. You will see later that this is very key to this whole operation.

STEP TWO Read the directions thoroughly.

By now you get the point. Directions = good.

STEP THREE Find desired location for lamp and plug it in.
You will want to do this. Trust me. You will see why.. eh, I’ll just tell you now. Once setup is complete, you will not want to A. Unplug it (unless you want to practice setting it up all over again), because the way it floats is due to electromagnetism. That’s short for ‘no electricity, no magnetism.’ B. Even if you do not need to unplug your lamp, sliding or carrying it will require very slow movement. The lamp’s magnetic field is easily thrown off balance (causing the shade to fall off) when knocked too hard.

STEP FOUR This is where you get your David Blaine on and make some magic happen.

Grab the clear plastic disc and find the side that has a tiny peg poking out from the center of it. Then look at the top of the lamp’s base and find the little hole at the center of that. Once found, place the clear plastic disc, peg side facing down, on top of base’s center and slide it around until the peg falls into the little hole, securing the disc in place.

Now grab your black cylinder/tube/thingamajig. Notice one end will have a thick border and the other end will not. Place the end that doesn’t have the thick border into your clear plastic disc. (You will know you’ve done it correctly because it also will slide securely into place.) At this point, find your little hockey-puck-looking magnet, hold it over the top of the cylinder as if you’re going to drop it in and take a trip down memory lane to junior high science class. If you feel that the magnet is trying to run away from the cylinder’s opening, that means it is repelling and you need to flip the magnet over for the side we need to work with. If there is no repelling, then we’re good to continue.

Next, drop the magnet into the center of the cylinder. The directions say to start much higher for this to work, but I found that starting right over the cylinder is fine. When dropped into the cylinder correctly, it will float on its own directly in the center. If done incorrectly, it will still float, but also rest on the walls of the cylinder. That’s a no-no. You will have to redo it.

Once you have the magnet floating in the center, you can now take the cylinder off by pulling it straight up. After that, push the plastic disc off the side. Neither of these are needed anymore.

STEP FIVE Place your lamp shade on the magnet.

So after spending some time looking at how cool the magnet looks floating there (because you’re definitely going to), you’re now ready to place your lamp shade. There is a groove in the bottom of the shade that allows it to sit perfectly on top of the magnet. Using some finesse (so to not knock the magnet out of ‘orbit’), place the shade on top.

WALLAH! Floating Lamp Goodness complete.

Conclusion
I also want to highlight that besides the floating feature, the lamp itself is pretty nice. As you can see from the pictures, it has a modern, sleek/Jetsons futuristic hybrid look to it. The light comes from the top of the base and the bottom of the base, with two separate touchpad light switches controlling the different sides.

Wherever you find yourself setting up this lamp, it will be a conversation starter for sure. My desk has easily become the coolest desk at UG (I’m accepting any challengers, what up?!) and anyone who notices it while walking by stops to take a closer look.

WARNING: With great power comes great responsibility. Like I said, this lamp will draw people in to take a closer look. They also WILL play with it, and they will knock the shade off over.. and over.. and over again. So get use to setting it up. But after the first couple of times, it’s easy as pie–Scratch that. I don’t know how to make pie, bad example. It’s easy as buying pie–and you’ll come to enjoy watching people’s expressions when they do knock it off. (Everybody’s face always look like they just broke an irreplaceable ancient artifact and are about to get hauled off to serve hard time for it.. or at least have to buy me a new one.)

At the end of the day, simply said, this is one cool lamp. And today it’s still on my desk, working as great as the day it came out of the box.

Also, that ‘lil guy basking in the lamp’s light in the picture? That’s Blocky. He makes sure my pens don’t go missing while I’m away from my desk.

Design

Slate Cheese Board Styled 3 Ways

March 19, 2013

Any apartment dweller knows the plight of a lack of storage. I cringe at the though of single-use items that will take up space on a shelf or counter (oh, how I’m dying for a waffle iron!). Since moving to New York City a couple moons ago, I have started to give a lot more thought to my purchases and make sure everything that enters my tiny apartment will be used. Simply, I don’t buy things that won’t get used frequently!

I spied the Slate Cheese Board with Soapstone Chalk since it was launched on our site months ago but wasn’t sure how often it would get used. Yes, I love cheese – many, many kinds of cheese – but it’s rare that any lasts long enough in my posession to leave out for guests. But the board was too gorgeous in all it’s rustic glory to pass up. So I took it home and gave myself a weekend to see how many times it could get used, finding that there were more uses for this board than meets the eye.

Build your own omelet party After work on Friday I met some friends at the gym to get the weekend started. Afterwards we all came to my place for dinner and I had two main objectives: a) eat some protein to rebuild muscle tissue and b) clean out my fridge. So I threw a “build your own omelet” party and set out the ingredients. It was a self-serve experience so everyone could make their omelet to their liking. I’m glad I got to label their choices so no one picked up an ingredient they didn’t want. The idea was a success and I can’t wait to throw another “build your own” party (sundaes, cocktails, pizza, grilled cheese…).

Movies in Bed Nothing is more fun that lounging in bed on a cold Saturday with your laptop and Netflix, but I always struggle with keeping crumbs from falling out of a lopsided bowl of popcorn. Wondering how the cheese board would fare as a bed-tray, I stocked it with gummy candies, a Mexican Coke and a heaping bowl of lime coconut popcorn while getting under the covers to tackle my growing queue. It did the trick and kept my soda and popcorn level when I readjusted in bed. That night’s sleep was not a story of the Princess and the Popcorn Kernel, thankfully.

Sunday Brunch One of my favorite New York past times is hunkering down after a morning of yoga with the NY Times and a cup of tea. Just sitting all day, leafing through the massive pages that cover my dining table. Since my Sunday brunch is never quite a complete meal – some fruit, nuts, a bagel, maybe a pastry – it was nice to spread out an afternoon’s worth of things to munch on as I caught up on current affairs. I was so comfortable, I didn’t get up until the sun went down and it was time to make supper.